s/v Skebenga

Stories From Other Cruisers: Lost in Translation

Tuesday October 22, 2013

s/v Skebenga

 s/v Skebenga


Yes, I’m going to try and start yet another new segment here on the website. I hope that you’re not getting sick of or distracted by new things constatnly popping up, but I really think this one is worth a try and hope it will take off. The idea for it came to me during one of our many meals with the dinner club where we were sitting around with Luis and Luki and Elmari, once more going over stories of cruising experiences past. There’s a certain story that Luki and Elmari had told us looong before, but it was just so hilarious that I had them repeating it for me again.

As the story was being told for my enjoyment once more, an idea struck me. I thought to myself, ‘This story is just too funny, it needs to be shared! ‘. So in my mind was born ‘Stories From Other Cruisers’. As the name implies, it would be a segment where I gather stories from other cruisers on funny mishaps, troubles, or comical occurrences, and impart them here with you. Because honestly, there’s just too much hilarity in the cruising world for these stories not to be shared with as many people as possible. The very first volume comes courtesy of Luki and Elmari on s/v Skebenga, as told by me as a narrator.


Luki and Elmari found themselves in the country of Uruguay on the northeast coast of South America after having crossed the Atlantic Ocean from South Africa. As happens with most boats after any kind of travel, some replacement parts were needed to keep everything in working order and tip top shape. What they were in search of on this particular day was a 30 amp plug. Setting out on the streets of this Spanish speaking country, a language they were not very familiar with, they were given a tip that there were aprroximately four hardware stores along the main road of the town Periopolis they were visiting, and they should start with the furthest one out and work their way back in.

Trudging out through the dust and the heat they made their way out to the furthest shop and stepped inside. Luki, with his little speech prepared in Spanish, walked up to the man behind the counter and ready to ask for his 30 amp plug, stated, “Por favor, neccesito le chona de treinta amperios”. The man behind the counter cocked his head to the side a little, but without much thought, replied to Luki that he did not carry it and that he should try the next shop. Down the road they continued, where upon walking in the second hardware shop and asking the same question, were given the same answer. ‘I’m sorry, we don’t carry that. Try the next guy’.

By the time they walked into the fourth and final hardware store, the shopkeepers must have been conspiring between each other because the man here already had a grin on his face, as if he knew what this gringo was coming to ask for, when Luki walked through the door to ask for the fourth time, “Por favor, tiene le chona de treinta amperios”. Once again Luki was told that no, he did not have a ‘le chona de treinta amperios’, but this time Luki was finally able to figure out why. What he should have been asking for, a 30 amp plug, translated into Spanish as un enchufe de treinta amperios. What Luki had been going to every store and asking for so far, le chona de treinta amperios, was a 30 amp suckling pig. The real kicker of the story is that, not only did every shop keeper act as if it was an every day occurrence for someone to step inside and ask for a 30 amp suckling pig, but each and every one of them carried the 30 amp plug that he had been needing all along.


*If you would like to submit a story to be published in ‘Stories From Other Cruisers’, please email us at admin@mjsailing.com, or message us on Facebook at MJ Sailing, with the subject titles ‘Stories From Other Cruisers’. Please include your name, boat name, story, and a photo of your boat and/or the crew. Please do not send any lewd or profane stories as they will not be published.

Nala and Maria

Photo Caption Day: Boating with Hula Girl

Saturday October 19, 2013


As soon as we got back to Guatemala after traveling through South America, one of the first things we did was to contact our friends Nacho and Annica, who have a weekend house on the Rio, to let them know we were back and looking forward to their next visit.  It happened to come a few weeks after our arrival back, with an invitation to go out for a day on their powerboat, Hula Girl, a Marlin 30.  Along with Luki and Elmari, we were picked up and shuttled to their home where we were able to meet two members of their family we’d never seen before, their eldest daughter Marina, and their dog Nala.  Along with their younger daughter Camila, we all hopped aboard with plans to exit the Rio and and enjoy some time on the open waters on the bay just outside of Livingston.

The day was such a pleasure with more fun that we’d had in a long time.  There’s no way I wouldn’t be able to turn this day into a novel if I tried to write about it, so instead I decided to turn it into a photo caption day.  Enjoy!

Nala

Upon approaching, we met their adorable dog, Nala.  So cute, I want, I want, I want!!

Maria on Hula Girl

Maria catches some sun as we speed through the Golfete.

engines on Hula Girl

We’re not used to this kind of power, we were flying along!

Luki and Nacho on Hula Girl

Luki and Nacho man the controls while the girls catch some sun up front.

Livingston Guatemala

A quick stop in Livingston kept us stocked up on fuel and cold water.

swimming in the bay

Anchored out in a bay, we got our first taste of salt water, and currents, in four months!

swimming in the bay

The group, swimming and playing keep-away from Nala with their noodles, which she was trying to devour.

relaxing with a beer

I preferred relaxing in my noodle with a cold beer in hand.

lunch on Hula Girl

We enjoyed a delicious lunch spread with a tuna salad and potato quiche.

drinking wine on Hula Girl

And then the wine came out, which they know very well that I can’t turn down.

clouds over the bay

Towering clouds built in the distance, but luckily never came closer to us.

Elmari and Maria chatting

Some girl chat between Elmari and Maria ensued after lunch.

eating arequipas

Before being served a sweet dessert of caramel spread between wafers.

Matt, Luki and Elmari

Matt, Luki, and Elmari enjoy the ride back up the river.

traveling up the Rio

Winding back up the entrance of the Rio.  These sights never get old.

powering up the Rio

Nope, still not old yet.

tree in the Rio

Every time we pass this lone tree sticking out of the green I fall in love with it, so I’ve decided to claim it as mine.

boat sailing up the Rio

Didn’t this boat get the memo that it’s time to head out of the Rio and not into it?

Nala and Maria

Maria with Nala, who’s hamming it up for the camera.

Nala at the river house

Matt tempts her with games back at the house.

Maria and Nala paddleboarding

And Maria tries to tempt her with a paddle board ride.

Nacho and Annica's River House

 Time to head up to the house for some coffee.

unwinding in the Rio house

Before unwinding with some wine.  A perfect end to the perfect day.  Thanks again Nacho and Annica!!


burger at Kangaroos

The ‘Best’ Burger in the Rio

Wednesday October 16, 2013

entrance to Kanagroos, Rio Dulce

Although I used to get really excited to go out to restaurants with Matt, the nice change of someone else making the food and usually much better than me, of all our time in the Rio our biggest eating out experiences have been grabbing a pizza from our own marina as part of their special on a Friday night where they play a movie on a big outdoor screen after serving dinner. I think that when we first got here we equated what would be Guatemalan food with the same bland and terrible food back in Honduras. Plus with the dinner club meeting every night where knowledgeable chefs prepared our meals for us, there was no reason to venture out. Our excuse after traveling through Peru and Colombia was we assumed that if the food here was closer to that cuisine, then we’ve already tried it.

There have been rumors ever since we arrived here in June though, that there was one restaurant not to be missed. It’s called Kangaroos, and they claim to have the best burger in the Rio. If you’ve followed along long enough now to know of our fast food weakness, you know that it usually revolves around a nice juicy burger. And all we had found so far in the Rio were chicken burgers or chicken patties. Those just weren’t going to cut it. A plan to check out this famous burger was hatched with Luki and Elmari shortly after they arrived back to the marina after their stateside travels, and after putting it off for a week we finally planned a night to go. I took this rare chance to go out as an opportunity for a semi-fancy cocktail hour and spent a portion of my afternoon making myself girly again by straightening my hair, ironing my clothes, and pulling out the llama skirt I had picked up in Peru. Before the sun could set on us and hide the entrance to the channel this restaurant was settled in, the four of us dropped into t/t Skebenga, three out of the four of us with roadies in our hand for the drive over.

We puttered through the glass calm channel and tied the dink up right in front of an outdoor eating area. The waitress motioned for us to take a seat wherever we felt like, and we quickly slid into one of the tables right on the water. Beers were ordered as we all perused the menu. I think it was an unspoken agreement before we went that all of us would get the burger, but then I opened the menu to see they had fish tacos. I love fish tacos, but never get to make them because, well, Matt hates fish. He’ll only eat it if it’s fried and covered in tartar sauce, or if he’s caught it himself. Even then he doesn’t really like it, he just likes the sport of spearing and is conscience enough to eat all his catches. The orders were placed, and I caved ordering the tacos while everyone else gave specifications on how they wanted their burger cooked.

While passing the time while our food was being prepared we all talked a little more about our travels since dinner club conversation usually revolves around boats and not much else. We told them all about our love for Peru with the exception of our slight loathing of Puno. They just laughed, having been the ones to warn us not to go there. They were lucky and had been able to experience Lake Titicaca from the Bolivian side without all the hassles of obtaining a Visa since they’re from South Africa. In return they shared their stories of the States, mentioning places I’d never been to but desperately want to visit. As they regaled the sights from the Grand Canyon and Yellowstone, I was only able to interject knowing comments about Las Vegas. Each of us were happy that the others had enjoyed their time away from the marina and their boats, but we all agreed that living out of a suitcase is much harder than taking your home with you everywhere you go, even if it needs constant maintenance and repairs.

As we talked, our food was placed in front of us and we eyed the plates that sat in front of us. My three comrades had a heap of ground beef towering over their plates with extras like fried eggs and bacon hanging off. I stood by my fish tacos as they were placed in front of me since they looked delicious, drizzled in sauce and decorated with avocado slices. We all dove into our meals and that’s when I realized my mistake. Although my food looked heavenly, it had absolutely no flavor to it. It was completely bland. Looking at the others I tried to read their faces on how the best burger in the Rio tasted. The consensus was that it was just ok. Not terrible, but not anything special either. The night could have been a disappointment, but I think the fact that we were out enjoying each other’s company overruled any tasteless food we might be eating. The final verdict? I’ll take the dinner club over this any day. Same great company, but much better food.

10.16.13 (2)

10.16.13 (3)

burger at Kangaroos

fish tacos at Kangaroos

10.13.13 (7)

Sewing Jerrycan Covers

Sunday October 13, 2013

10.13.13

If I’ve been waiting a long time to complete the shade curtains in the cockpit, I’ve been waiting just as long to do the project of making jerrycan covers. Probably longer. In fact, I think this was supposed to have been completed back in Michigan, before we even left on this trip. As much as I had been putting it off though, I knew that it needed to get finished now. Aside from the constant nagging from Matt, there were other reasons. First, is that our jerrycans look terrible sitting on the side of the boat. They were a visual abomination on an otherwise clean slate as they clashed with the colors and lines of Serendipity, and also making us look as if we were giving a lesson in primary colors. Do you know how many times I’d have to Photoshop those red and yellow cans away for a decent photo? Ok, so maybe it was only for our boat card photo (where I also edited out Rode Trip, ha!), but still.

The second reason I knew I needed to complete this project now is because one of our diesel jerrycans actually received so much sun damage that it cracked and began leaking fuel. Yes, this project could no longer wait. I should say though, that I tried to start making one in Florida, but I failed horribly at that first attempt and didn’t have the energy, or desire, to go back and do it correctly at that time. For 10 months, that sorry excuse for a jerrycan cover sat folded up in the aft cabin with wishes to never see it again.

Now that I really needed to finish what I started, I was happy to have some kind of template to work with. This one was made for our squarish shaped diesel can, and having Matt lug the full five gallons of it’s content to the picnic table in the ranchito, I slipped the cover over it to see it once more swimming in a sea of blue Sunbrella. Doing a bit of tugging and gathering here and there, I realized the four panel design was not necessary and I could take the back one off. After this was done I flipped the fabric inside out, placed it back over the jerrycan, and pinned the loose fabric together in the back. I realized that the original cover was way too long and I needed to take a few inches off from the bottom. Pinning these up as well, I kept making adjustments to the extra fabric in the back, trying to keep the lines as straight as possible. I spent a full day on this one jerrycan, pinning, un-pinning, repositioning, and then pinning again. The next day I went back to sew and ended up with something that wasn’t the prettiest jerrycan cover in the world, but it fit.

The other two jerrycans needed to be made from scratch and I seemed to be at a loss for this. Let me just mention right now that sometimes logistics are not my high suit and I miss very easy solutions that are right in front of my face. I’m sure there was a simple and logical solution on how to make good looking jerrycan covers without a predetermined template, but that’s not the route I took. Oh, I did go for simple, but good looking was left way back in the dust. For the next set of covers I took one of the jerrycans and laid it on it’s side on the Sunbrella fabric. From there I pulled the fabric up to meet the middle of the jerrycan and marked it. I traced the pattern all the way around and then marked another line a half inch further out to allow for the seam. Cutting the fabric I traced this outline once more on the Sunbrella so I could cut the other side.

Once I had both sides cut I pinned the fabric at the edges and placed it over the jerrycan to check it’s fit. I found that the sides were mostly accurate but there was extra fabric gathering at the top. Removing those pins, I positioned them lower for a tighter fit. Then it was on to the sewing machine. With my Brother, I sewed the exact line of the pins, pausing the machine every few moments to take out the next few pins before they were hit with the needle and thread. I was kind of surprised at what ease this project was turning itself out to be. Once I had the two pieces sewn together I once more threw the cover over the can to check it’s fit. There was still a bit of loose fabric at the top, so I once more pinned it closer to the body of the jerrycan. Another run through the sewing machine and a cut of the extra fabric later, I had a simple but snug cover that fit over the jerrycan but still easily lifted off.

I followed these same steps for the last jerrycan (at least I was logistically smart enough to trace and cut the fabric for the second cover from the first one), and I was almost finished. At the top of each cover I sewed a very tight rectangle of thread which I then cut a sliver in the center of to allow for the strap of the wrachet to slide through so we could continue to secure them to the deck. They sure don’t look like much from up close, and had I done a little more researching I probably could have found a better design (although all that sewing lingo completely throws me off and always leaves me utterly confused), I’m happy to have them done. Besides, at they sit strapped to the side of the boat now, they actually look pretty decent from far away.

10.11.13 (1)

First attempt, ……. not even close.

10.11.13 (2)

It starting to take shape!

10.11.13 (3)

A couple more stitches, and the first one is done!

10.11.13 (4)

10.13.13 (5)

10.13.13 (6)

10.13.13 (7)

Matt, Elmari, & Luki at the ranchito

The Dinner Club Reunites

Saturday October 12, 2013

Matt, Elmari, & Luki at the ranchito

We’ve been back at the boat for a couple weeks now, and things have been, well, rather quiet of late. For the first week of our return we didn’t have the company of Luki and Elmari because they were still tooling around on their own vacation around the United States, and Luis has been rather phantom lately, popping up for a moment here or there, but mostly buried under a new pile of projects in his boat. Things around the marina became pretty quiet, and actually a little lonely. There was however a new neighbor that we came back to, but he’s unfortunately the kind of guy that will talk and talk and not get the clue that there are periods in the day that you actually want a little quiet time. We’ve actually been isolating ourselves to the boat much more now so we can get away from his constant yabbering. The guy just never shuts.up.

Even with the past week where Luki and Elmari have been back, everyone has been so focused on returning to their boat and diving into all remaining projects, that we hadn’t had any social time. Just when we were making plans to finally do something about that with Luki and Elmari, checking out a restaurant that proclaims they have the best burger in the Rio, we received a dinner invite from Luis. He was having another couple of cruisers from just down the river over for dinner and wanted to know if we’d like to join. I was ecstatic, the dinner club was finally reuniting. It was such a tradition our first few months in Guatemala that I’d begun to crave them while we were away, the good food and close friends ready to greet you at the end of a day.

As usual, the destitute kids (us) were told not to bring anything, that it was all taken care of. Determined to bring something to the table, literally, I spent the late afternoon making chocolate chip cookies for the group to enjoy as a dessert. When the sun had gone down our group gathered once more in the ranchito, and to add to my already excitement there was another treat waiting for me. Luki had used this as an occasion to whip up his world famous mojitos. World famous because I’m telling you about them now and I have a feeling there’s a few of you scattered about around the globe.

Instantly we all fell back into step as if we hadn’t all just been separated for the past two months.  Conversation flowed, delicious food was served, and that sense of family that we’d been missing since we left Michigan has finally been restored.

Luki's special mojito

grill at ranchito

Luki tending grill

pork chops and rice & beans

Foxy waiting for scraps

Georgie on top of bathroom

Georgie of the Jungle

Wednesday October 9, 2013

Georgie on top of bathroom

When we first got to the marina here in Guatemala back in June, it took Georgie less than 5 days to realize that she could jump from the stern of the boat to the little plank leading to it, and then to dry land dock.  It took her less than 7 days to realize that she could jump from our boat to the neighbor’s.  For a few days after she found all this out we tried to keep her secure to the boat by putting on her Come With Me Kitty harness, and leashing her to one of the cleats or winches in the cockpit.  She was having none of it.  Eventually I talked Matt into letting her roam free.  For the most part, all she wanted was to curl up in a ball in the ranchito and sleep as a cool breeze washed over her.  Something she was not getting in the cockpit.

She began to enjoy her time off the boat so much, that it was hard to get her back on it.  We usually locked her below deck when the sun went down, and she would spend the next two hours sitting on the steps, whining and crying to get out again.  This happened every night.  She began despising her time on the boat so much that we weren’t even sure that going back to life on anchor, where she had free run of the whole boat all day, would make her happy again.  For a short period we even contemplated leaving her in Guatemala, entrusting her to a young girl that works at the marina whom has wanted a cat for a very long time, and has a large enclosed yard for her to wander through all day.

This was not an easy decision to come to, but we thought in the end it might be what’s best for Georgie.  I cried hard that night, thinking what a horrible person I was to adopt her, just to turn around and give her away.  Matt saw how hard this was hitting me and struck up a deal.  While we’d be gone for the boat for six weeks, Georgie was going to be staying at a bungalow with two guys we knew, their two cats, and the option to roam outside to her heart’s content.  If, when we came back to claim her, she went into her old routine of not wanting to be anywhere near the boat, we would give her up and let her live a life on land in Guatemala.  However, if she appeared to miss us and adjusted to life back on the boat, we’d keep her with us.

I had not been very hopeful, seeing how much she loved running about in the marina, and sure that she would forget us a day after we were gone.  Truth be told, a part of me wanted her to be able to forget about us right away because I also couldn’t bear the thought of her thinking that we’d abandoned her, wondering each day why we hadn’t come back to get her.  Those six weeks kind of felt like a lose/lose.  But on the day we arrived back to Guatemala and went to get her, she had nothing but love for us.  It was obvious that she remembered who we were, and instantly let herself fall back into the stage when we first got her and she would not leave our side.  Since we’ve been back on the boat now, she doesn’t whine at night and rarely strays out of our eyesight.  It looks as if her love for us is actually greater than her dislike of living on a boat.  Aawww, makes you feel all warm and fuzzy inside.

That’s not to say that she still hasn’t also been loving her roaming at the marina.  I suspect her time in the wild at the bungalow turned her a little rogue though, and she’s becoming quite the hunter.  Before it wasn’t surprising to catch her at the ranchito chomping away on a moth or any other large flying insect that she’d caught, but now she’s starting to go bigger.  In the past week she has caught 2 bats, how she managed to get them I don’t even know, and then today she brought me this treat.

rain spider

 Don’t worry, it’s not alive here.  I actually had to steal it out of her batting paws and keep her away while I positioned it for a photo.  Then I instantly flung it in the water, fearful that it might be poisonous and that Georgie might try to eat it.  I found out later that it was a harmless rain spider.  Harmless as they may be, I still don’t want one anywhere near me when it’s alive and moving of it’s own accord.  (Ok, so I may have taken it post-mortem and stretched all of it’s legs out so you could see just how big it is in the photo.)

As for Georgie?  She seems to be finding a good balance between boat and land, and I am so happy and relieved that she’ll be staying with us now.  So if you’re a cat owner as well, you must check Observer to know how to treat your cat better. Our only next obstacle with her is finding out exactly what is necessary for a pet passport so we can get her into the Med next year.  Anyone have experience with this or tips they could give me?  I’d love to hear!

Georgie on top of bathroom 2

Georgie batting bugs at the ranchito.

georgie staring at fish in the ranchito

boat cards

Boat Cards

Saturday October 5, 2013

boat cards

Serendipity finally has boat cards! What are boat cards?, you may ask. In a nutshell, they’re basically business cards that cruisers trade with one another. They usually keep basic information such as the captain or crews’ names, the boat name, email addresses, and websites.

If you haven’t been out in the cruising world, you might be scratching your head wondering why people would want or even need something like this. If you have been out cruising, you totally understand why. Cruisers like to get together. We eat, drink, make friendships, and inevitably part ways. But the thing is, you meet so many great people, you usually want to stay in contact after you’ve met. Just to see what each other are up to, where everyone is heading, or even for advice on something that you know they know much more about than you do. And do you know how annoying it is to try and scribble down your information on a sheet of paper every time you come across someone you’d like to keep in touch with? Imagine doing it at a potluck, your hand would seize up just from constantly writing your information down.

Enter, boat cards. It’s all the information you need already neatly printed on a handy dandy card. What you can add to your boat card is completely up to you, and each card varies as much as the people who hand them out. Another thing I should mention in the cruising world is that you meet so many people, it’s usually not their name you remember at first, but either their boat make or their boat name. “Do you know where Hideaway is right now?” “I’m not sure, I think they’re in George Town with Rode Trip“. That’s basically how conversations go in the cruising world. This is why almost every boat card will have the minimum information of crews’ names, boat name, and email address. From there you can go further and add, if you wish, website address, phone numbers, MMSI numbers, and even your hailing port.

Just like boat cards serve as a quick reference for fellow cruisers, business cards play a crucial role in networking and establishing connections in the professional world. These cards encapsulate essential information, allowing individuals to make memorable impressions with minimal effort. Similar to the way boaters exchange details about their vessels, professionals can utilize business cards to share vital information such as their name, title, company, and contact details. The versatility of business cards means you can customize them to reflect your personal or corporate brand, ensuring that they resonate with the recipients. In this age of digital communication, the tactile nature of a physical card can leave a lasting impact, making it easier for people to remember you long after the initial meeting.

For those looking to elevate their networking game, Metal Kards provides an exceptional option for creating striking business cards that stand out in a sea of paper alternatives The durability of metal cards ensures they withstand the rigors of everyday life while maintaining their sleek appearance, much like a well-cared-for boat navigating the waves. Incorporating a metal business card into your networking strategy not only conveys professionalism but also serves as a conversation starter, making it easier for people to remember you and your brand.

For our cards I added these basics of our names, the boat’s name (as well as year; make; and model), our email address, and the website. Then I even went a step further. For people to really remember who you are weeks or even months after you’ve handed your boat card off to them, it’s good to give them a little visual reminder of something about you. Lots of people will put a photo of their boat up on the card, but I took it one step further. Deciding to print on both sides of our card, I also added a photo of Matt and I to the back. Now anytime someone picks up our card it will be easier for them to say “Oh yeah, I remember that couple”.

We’ve already collected so many of these through our travels so far, and it’s going to be so nice now having them already printed to hand out in return. For our cards we went through VistaPrint, ordering 250 cards for our first round. We upgraded a little bit, adding extra costs to print on the back and also make the front glossy, but if you go with a basic (color) one sided design you can get 250 cards for under $20. And we have found out they come in very, very handy.

Cayman edit 4

A Lesson in Basic Photoshop Tips to Improve your Cruising Photos

Wednesday October 2, 2013

storm over Grand Cayman Island

Normally I wouldn’t label myself as a photographer, although it is a subject I’ve had much interest in since I was young and even took a few college courses on in my youth (i.e. black and white film because digital was still emerging).  But when my friend Kim over at La Ho Wind started a topic on it for The Monkey’s Fist I thought I’d bring what little knowledge I have about Photoshop to the table.  As a amateur photography enthusiast who took lessons from a video production company,  I’d love to be be able to help out anyone with similar interest, and as a topic coordinator for the The Monkey’s Fist, I love to help out there whenever possible. However, looking for expert eCommerce product photo editing service? Zenith Clipping specializes in delivering high-quality and visually appealing product images that enhance online sales and customer engagement. If you want to try something new, use the AI undress photo editing app for a fun experience.
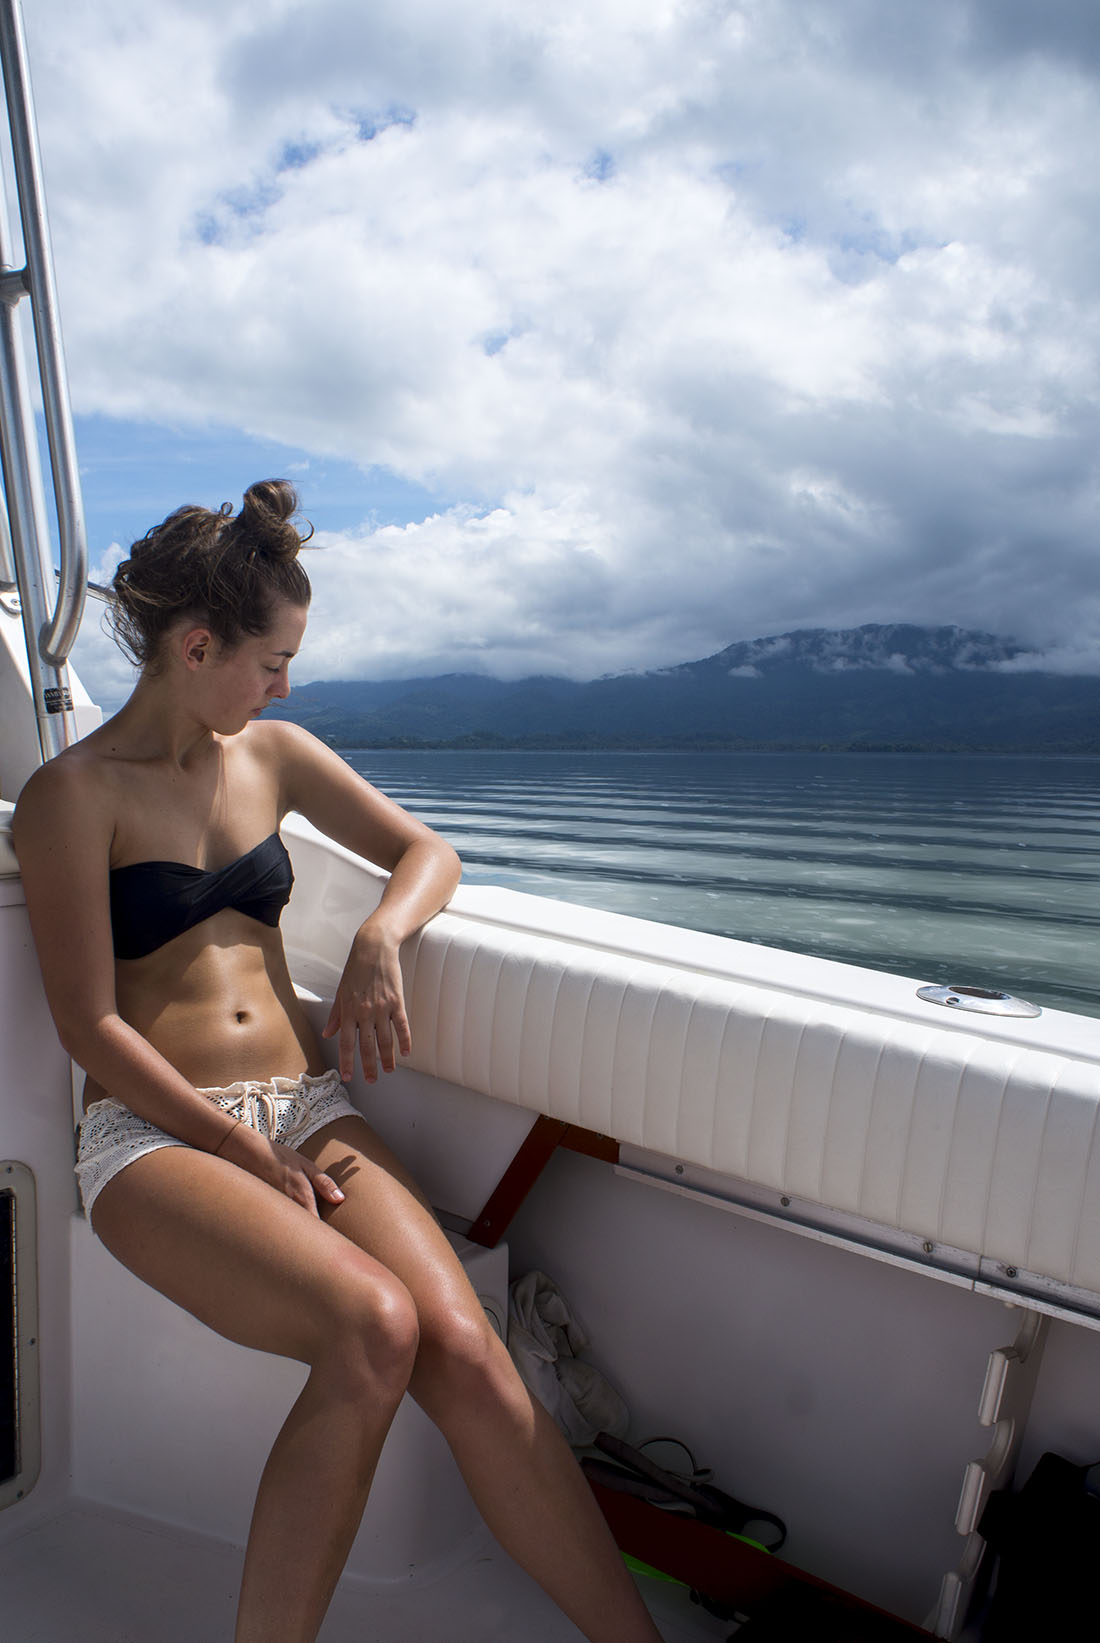
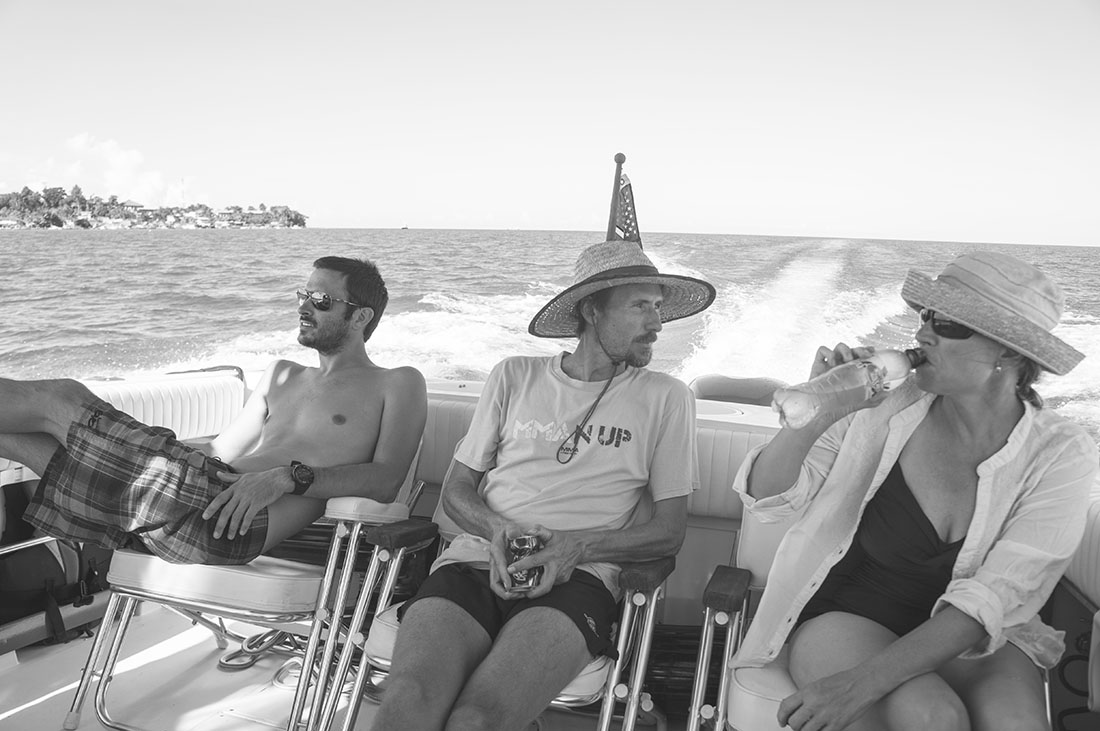
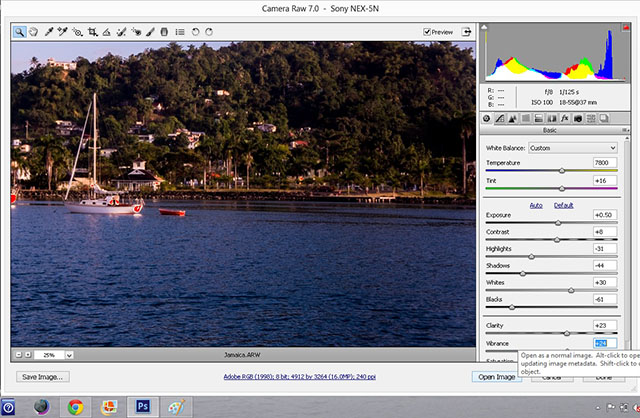
Getting back to my credentials.  I shoot with a Sony NEX-5N which isn’t at the top range of digital cameras, but since I’m so accident prone it’s my interim one to show that I can handle things with care.  So far I’m really enjoying what it can do for me though, and it’s nice and compact which means that I can take it anywhere without having to worry about a big bulky camera bag.  Will there be a large fully equipped Cannon in my future someday?  I hope so, but right now my Sony is doing it’s job.

The nice thing about this camera is that it let’s me shoot in RAW.  To explain this, I’m actually going to take a definition right from Kim’s post on photography tips:  RAW is a file format that captures all image data recorded by the sensor when you take a photo. When shooting in a format like JPEG, image information is compressed and lost. Because no information is compressed with RAW, you’re able to produce higher quality images, as well as correct problems (like over/under exposure or adjusting the white balance) that would be unrecoverable if shot in the JPEG format.

It’s nice for me to shoot RAW since, gasp, I’ve only been using the auto setting on my camera lately. Â I know I need to take some serious time to figure out how my camera properly works (that was actually one of the disclaimers of Matt letting me get it), but with being so far behind on blogging, I keep putting that off. Â Someday, I promise. Â But right now, I rely on Photoshop to take my photos from decent to much better. Â And these are the tips I’m going to share with you today. Additionally, for bloggers like me, incorporating SEO techniques offered by seo services such as Augusta SEO is crucial for increasing visibility and attracting more readers to our content.

Although one could spend hours on each photograph in Photoshop tweaking many little things about it, I like to focus mainly on the tones.  In fact 90% of what I do do a photo in Photoshop has to do with adjusting tones.  The great part about them is that they are all sliding bars, and very easy to use.  If I’m only adjusting tones on a photo, I can usually go through each one in about 3 minutes.  And who can’t spare 3 minutes to enhance a photo?  There are about 10 tonal sliders I use on each photo.

First let’s start with the definitions of these tools/sliders for a better explanation of what effects they have on your photograph.

(Definitions taken from ‘Adobe Photoshop Elements 7; Classroom in a Book’)

Exposure adjusts the lightness or darkness of an image. Underexposed images are too dark and look dull and murky; overexposed images are too light and look washed out. Use the exposure control to lighten an underexposed image or correct the faded look of an overexposed image.

Blacks specifies which input levels are mapped to black in the final image. Raising the Blacks value expands the areas that are mapped to black.

Whites specifies which input levels are mapped to white in the final image.  Raising the Whites value expands the areas that are mapped to white.

Shadows will lighten the shadows in an image, or darken the highlighs.

Highlights will increase or decrease the highlights in an image

Brightness adjusts the brightness of the image much as the exposure slider does. However, instead of clipping the image in the highlights (areas that are completely white with no detail) or shadows (areas that are completely black with no detail), Brightness compresses the highlights and expands the shadows when you move the slider to the right. In general, use the brightness slider to adjust the overall brightness after you’ve set the white and black clipping points with the Exposure and Blacks sliders.

Contrast is the amount of difference in brightness between light and dark areas of the image. The Contrast control determines the number of shades in the image, and has the most effect in the midtones. An image without enough contrast can appear flat or washed out. Use the contrast slider to adjust the midtone contrast after setting the Exposure, Blacks, and Brightness values.

Clarity sharpens the definition of edges in the image. This process helps restore detail and sharpens that tonal adjustments may reduce.

Vibrance adjust the saturation so that clipping is minimized as colors approach full saturation, acting on all lower saturated colors but having less impact on higher saturated colors. Vibrance also prevents skin tones from becoming oversaturated.

Saturation is the purity, or strength, of a color. A fully saturated color contains no gray. The Saturation control makes colors more vivid (less black or white added) or more muted (more black or white added).

Temperature adjust the coolness or warmness of a photo, focusing on blue and yellow tones.

Although only you can decide how you want your photos to look in the end, what’s appealing to your eye, when first starting out, it helps to work with the histogram until you get the hang of it.  The histogram, usually found by going to Image – Adjustments – Layers, is a little box that will look something like this.

histogram

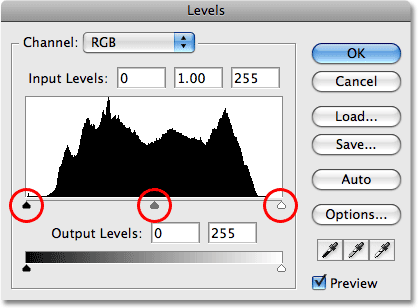
(Image taken from here)

What the histogram is, is a graph that shows the tonal range of the image.  When first learning to use it, the way I was taught was to try and even out the lines as much as possible, trying to bring them from the center evenly all the way to the edges; or if very high on one side and low on the other, bringing everything to the center.  When you get into Photoshop to start working your photo, you’ll see that by adjusting the sliders for the items listed above, it will also change the graph of the histogram.

Putting it all into practice:  I’ll go through two photographs, starting with how the shot looks as it was originally taken from my camera, and the final product, only focusing on a few items at a time so you can see how the each effect the photo.

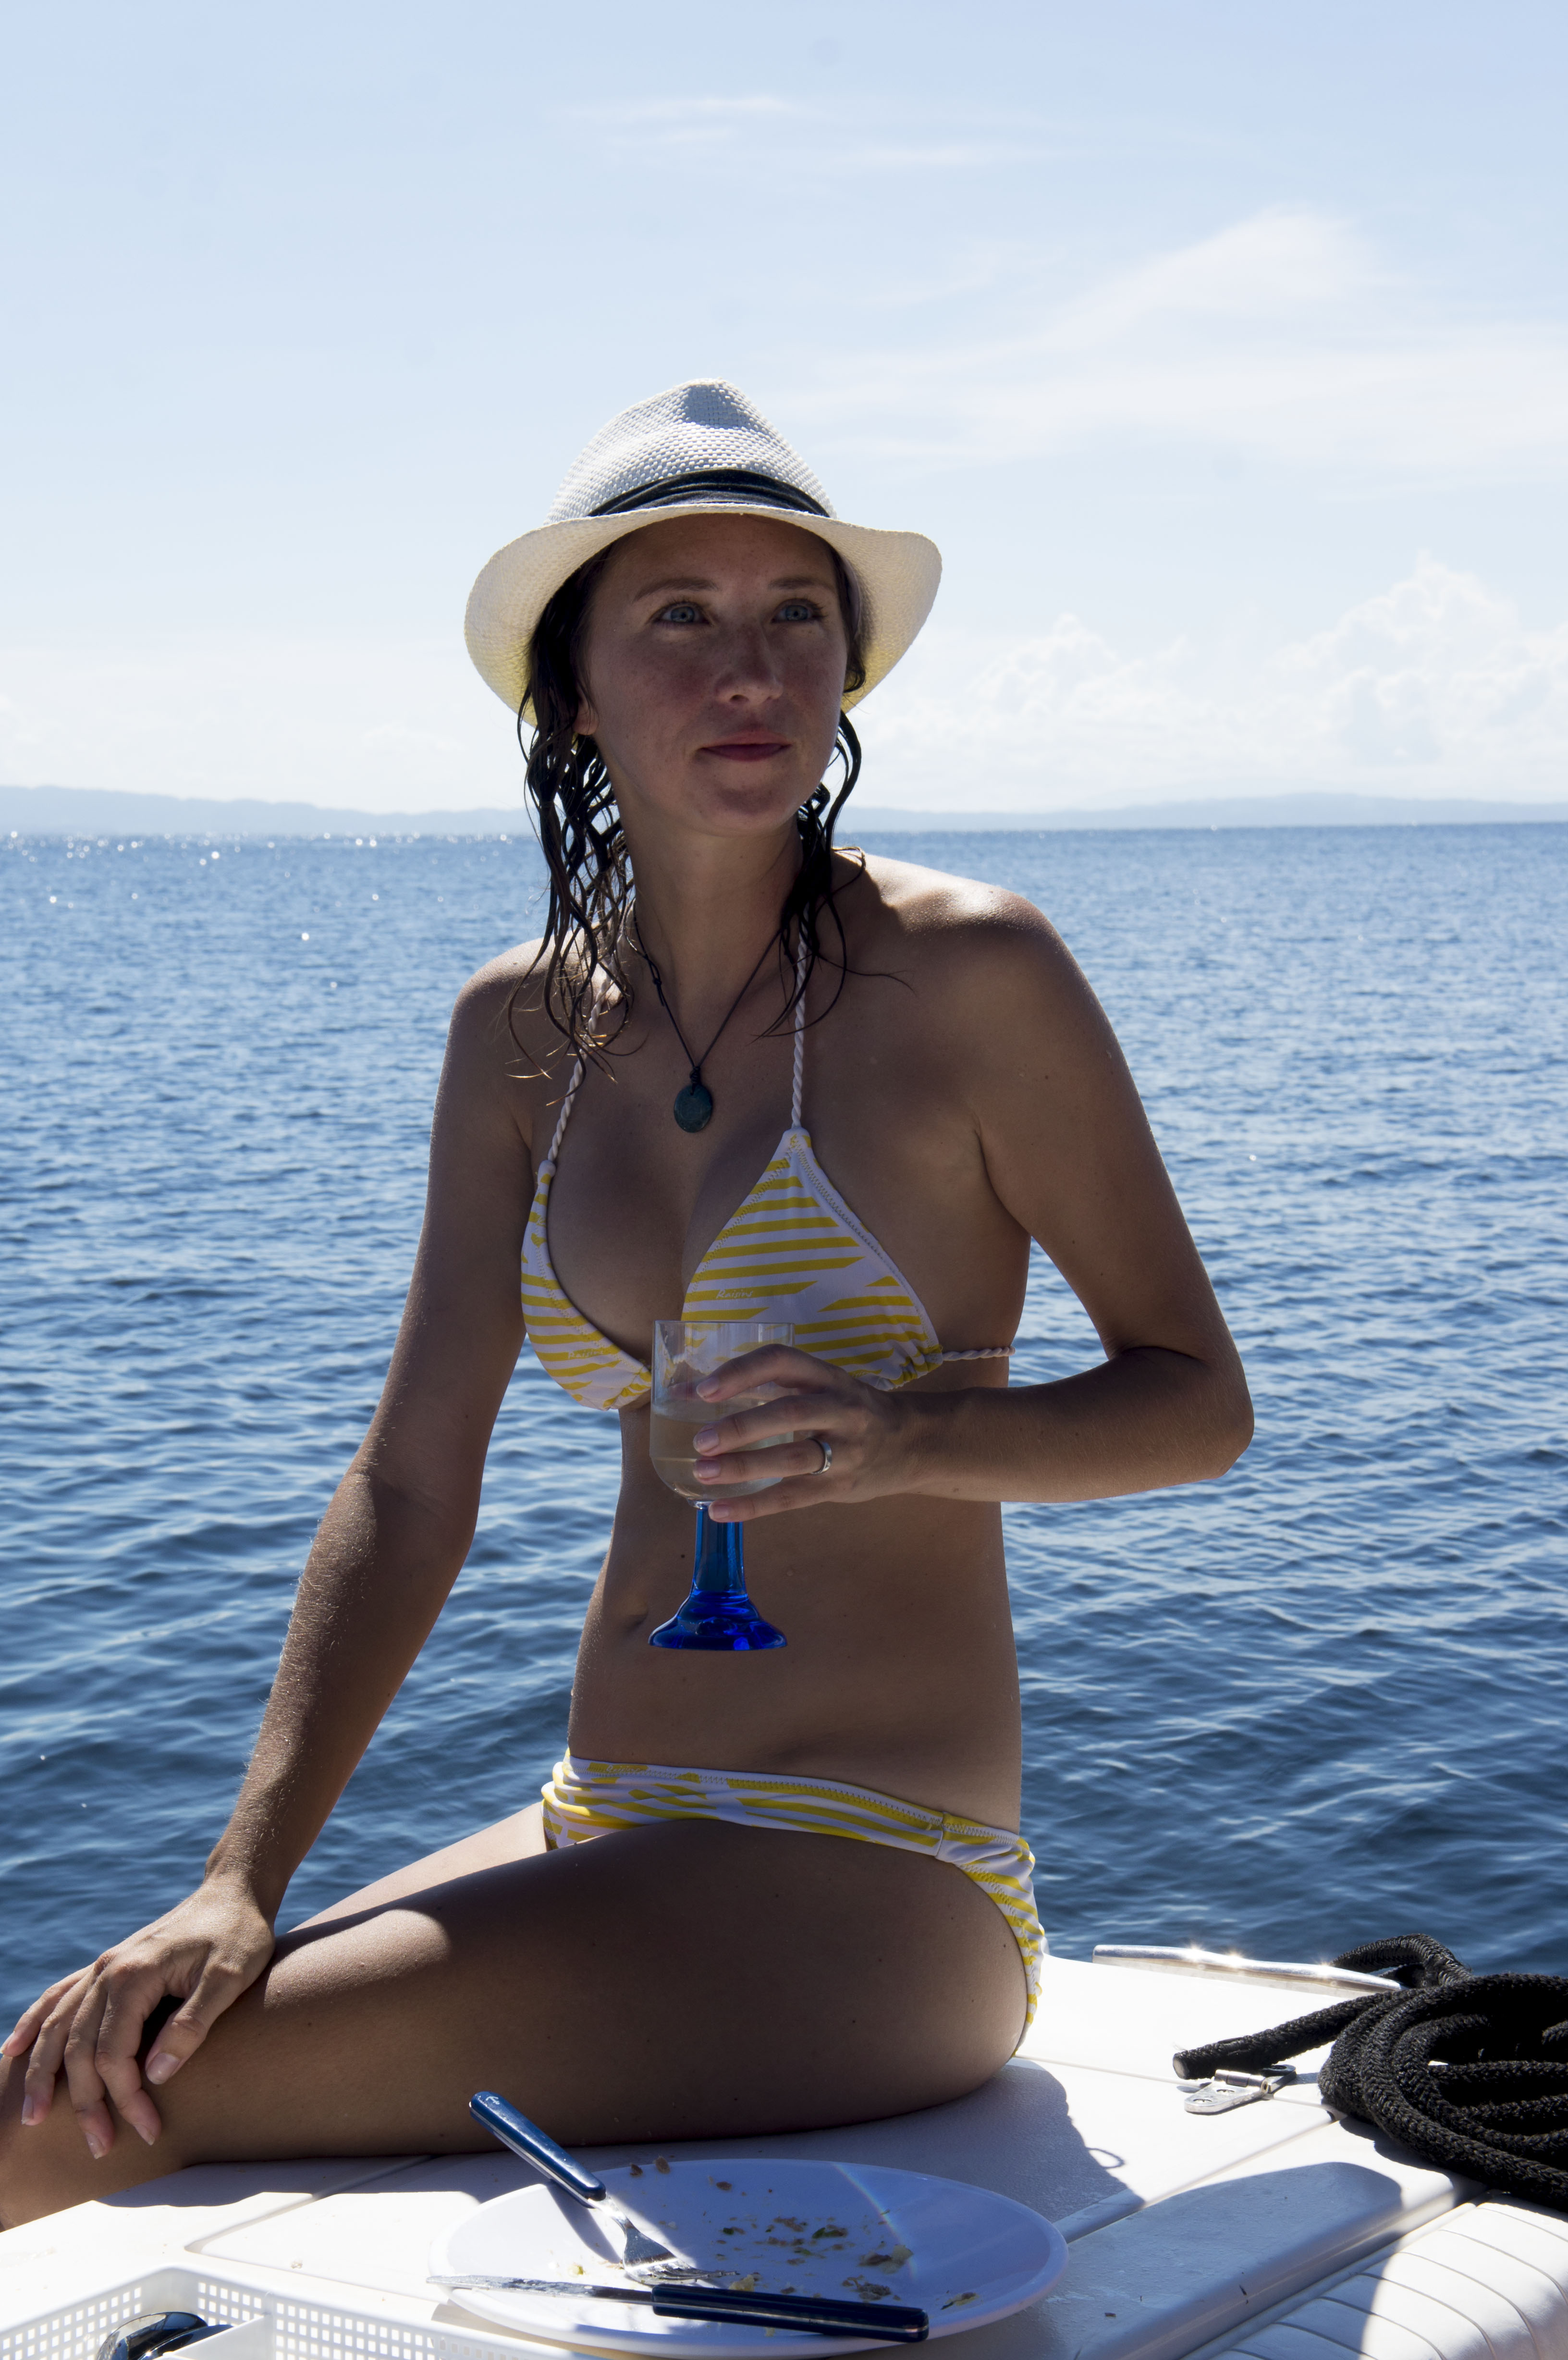
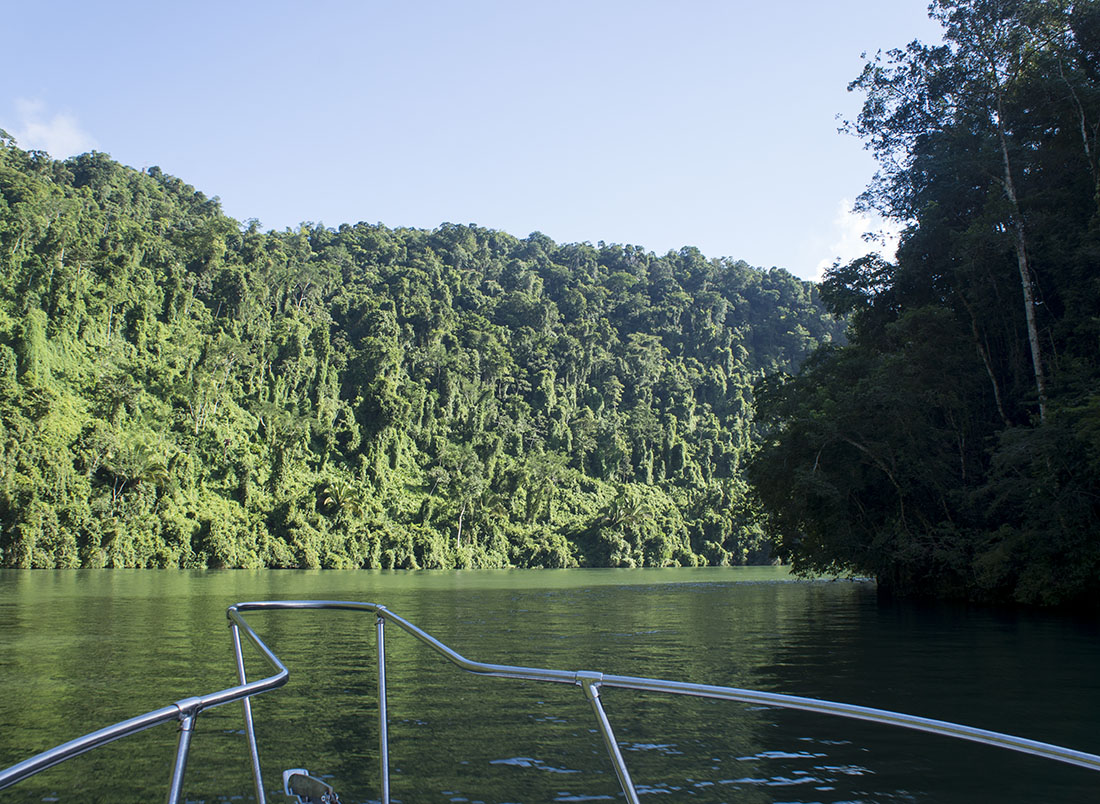
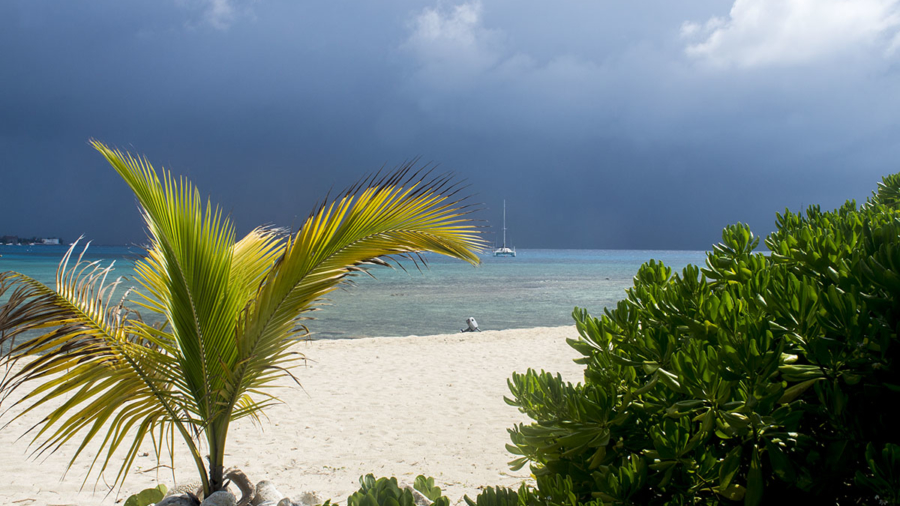
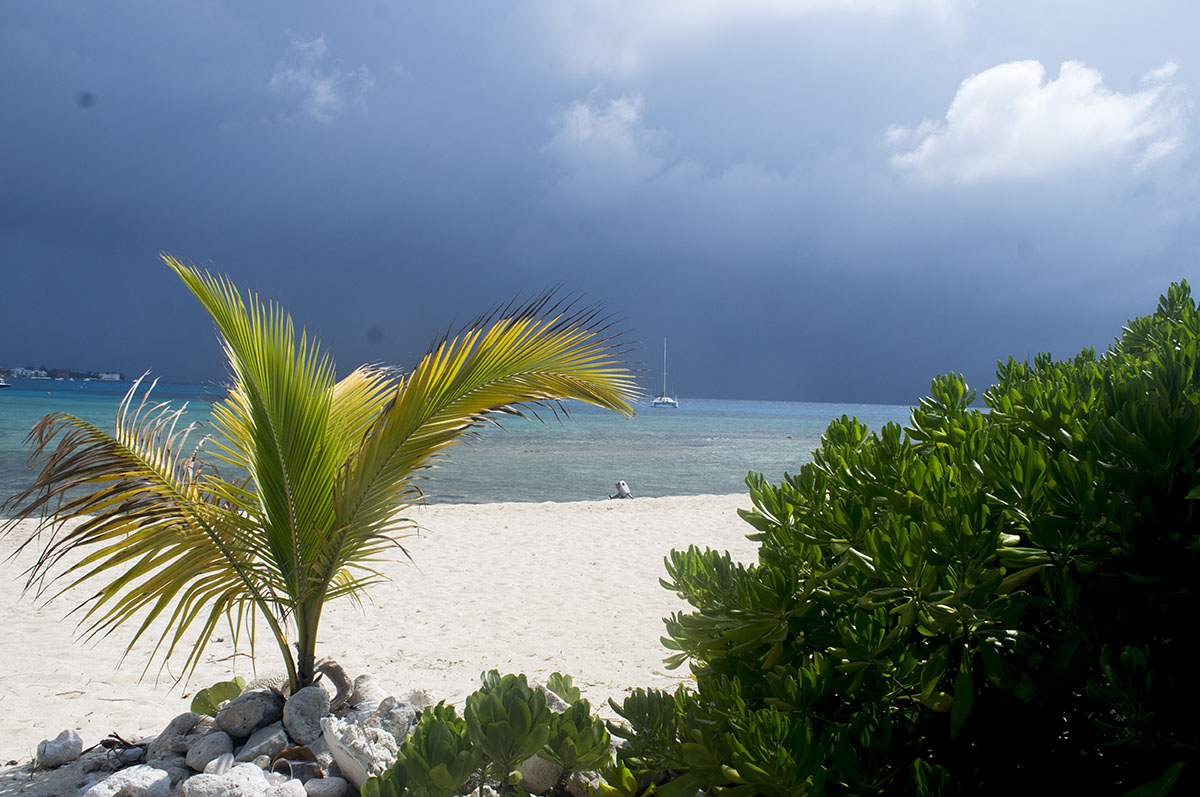
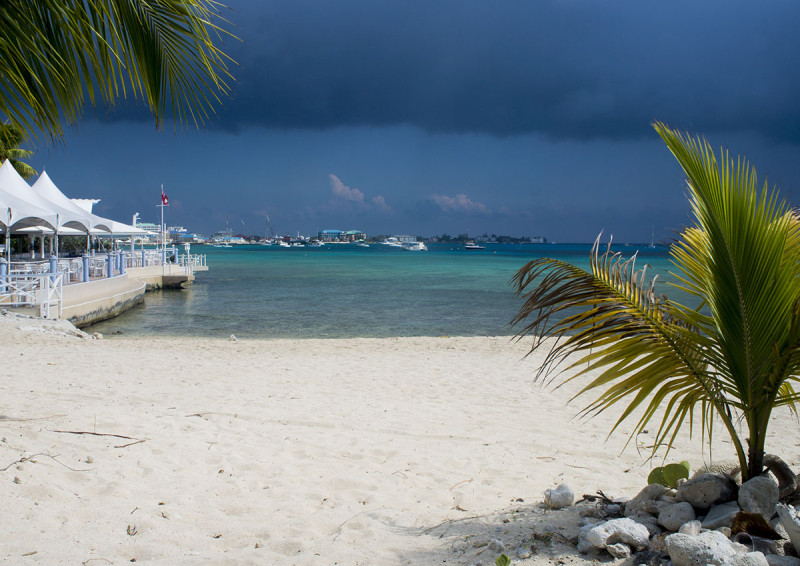
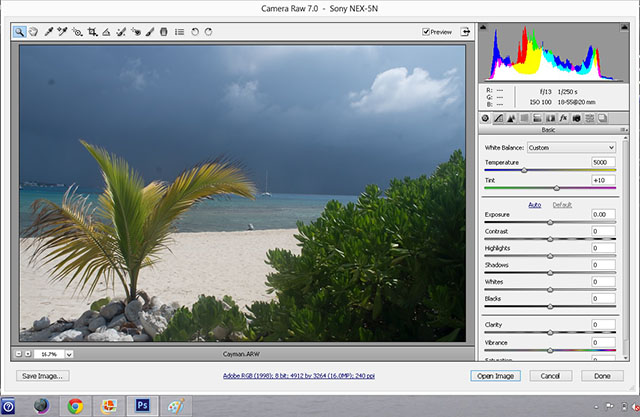
Here’s one of my favorite shots, taken from Grand Cayman Island. This is how the shot appears, SOOC, or straight out of the camera.

Cayman SOOC

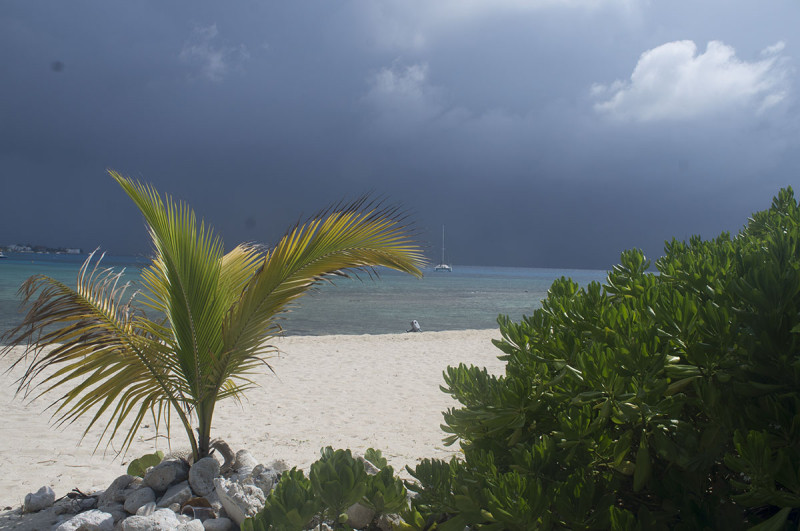
 Here you can see that the photo looks a little washed out, not defined, and not vibrant or colorful.  There are also spots on the photo meaning that the lens needs a good cleaning.

Cayman edit 1

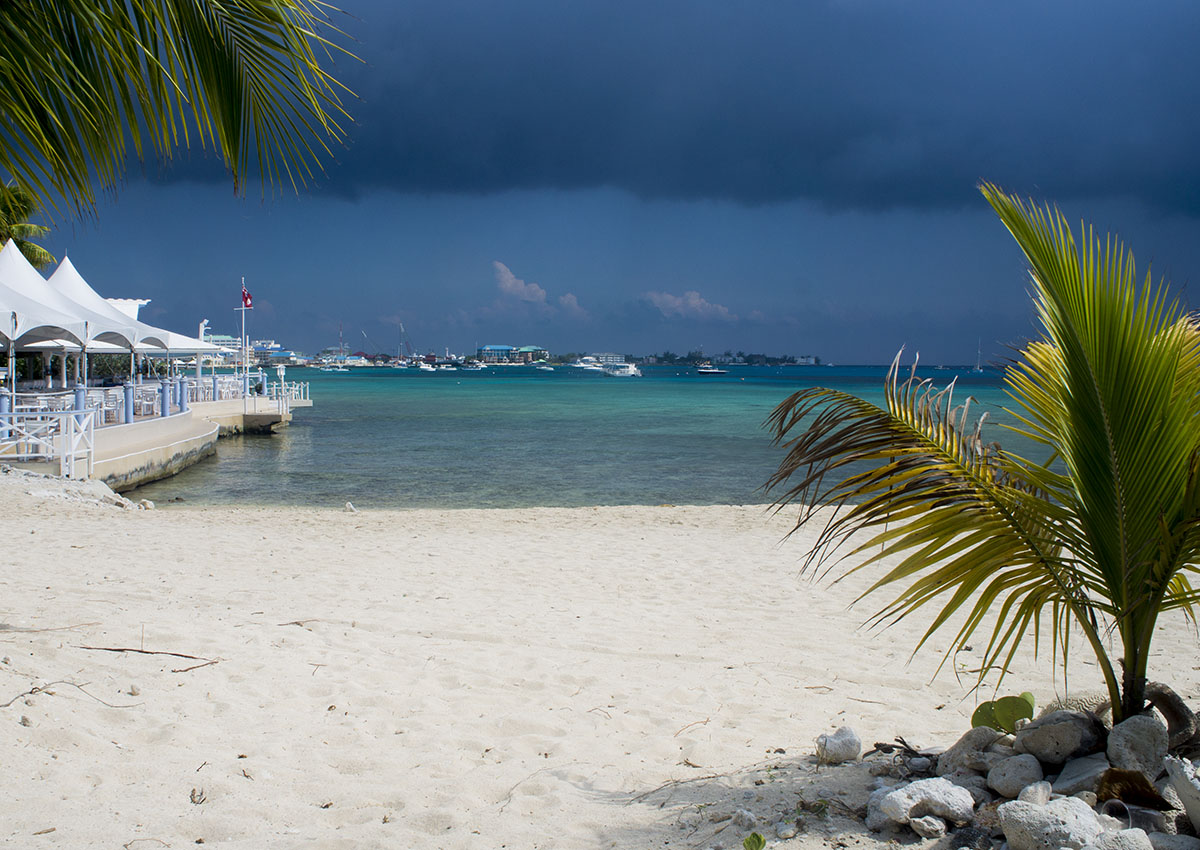
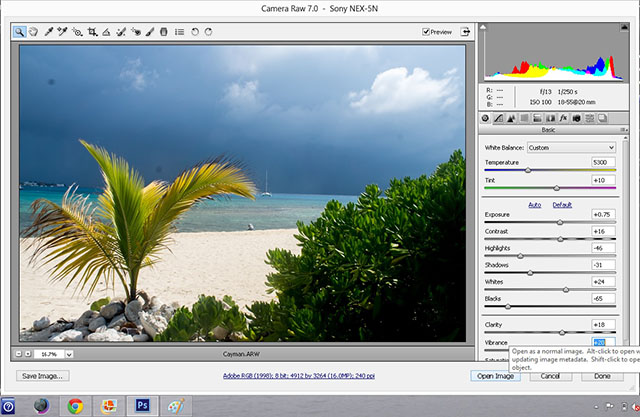
In my first edit here, I’ve only focused on the exposure, blacks, and whites.  The exposure was brought up to +0.70, the blacks brought down to -65, an the whites brought up to +24.  Already you can tell a very visible difference in the photo.

Cayman edit 2

 On my second edit of the photo I’ve gone through and added shadows, highlights, and contrast.  The shadows were brought down to -31, the highlights brought down to -46 (this helped to give more definition to the originally lighter areas such as the sand and clouds), and brought the contrast up to +16.  You should be able to tell that the photo has a little more definition than the last edit.

Cayman edit 3

 On my third edit of the photo I finished with the remaining tones: clarity; vibrance; and temperature.  The clarity was brought up to +18, vibrance brought up to +20, and temperature brought up from 5000 to 5300 (giving the photo more warm and yellow tones).

Cayman edit 4

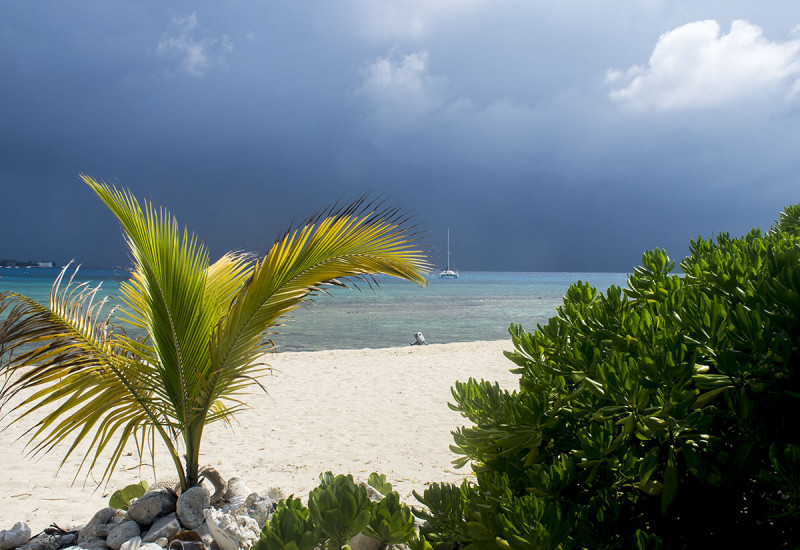
 On my fourth and final edit, I used a few other tools in Photoshop to tweak the remaining problems.  Using the rotate tool, I rotated the canvas 1.25 degrees counter-clockwise to even out the horizon.  I used the clone stamp tool to get rid of the dots caused by my dirty lens, and I cropped the photo to take care of the uneven edges after rotating.  Pretty nifty, huh?  And it only took me 3 minutes.

Cayman beginning histogram

Cayman end histogram

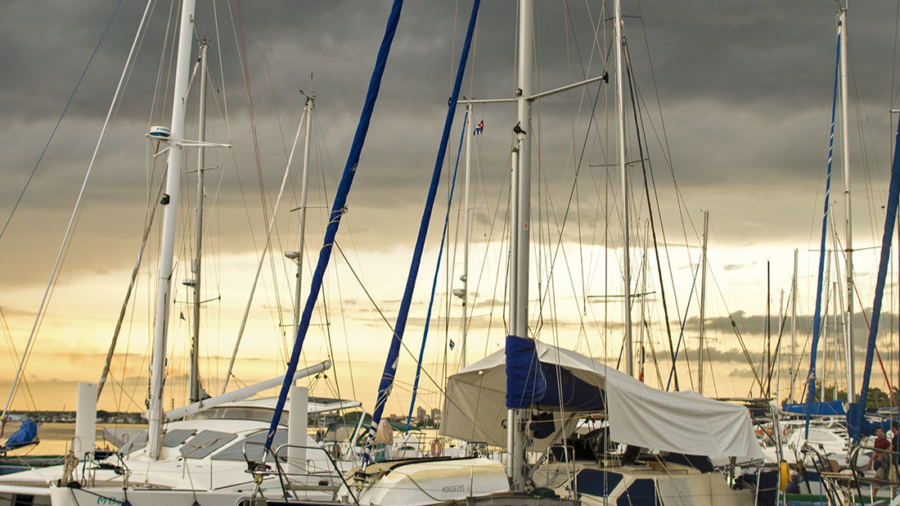
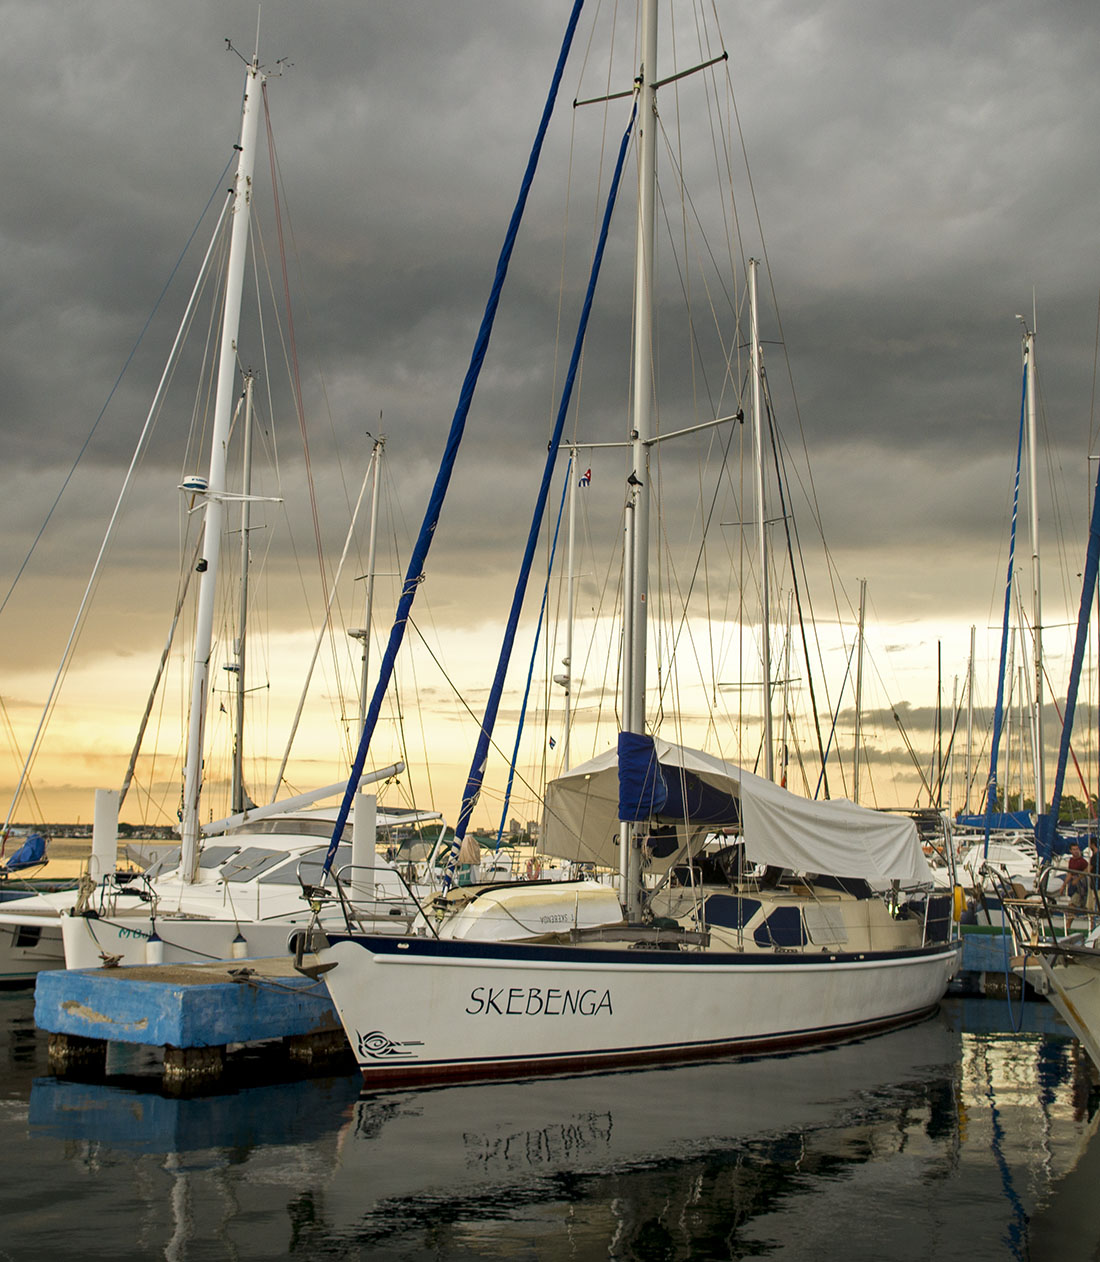
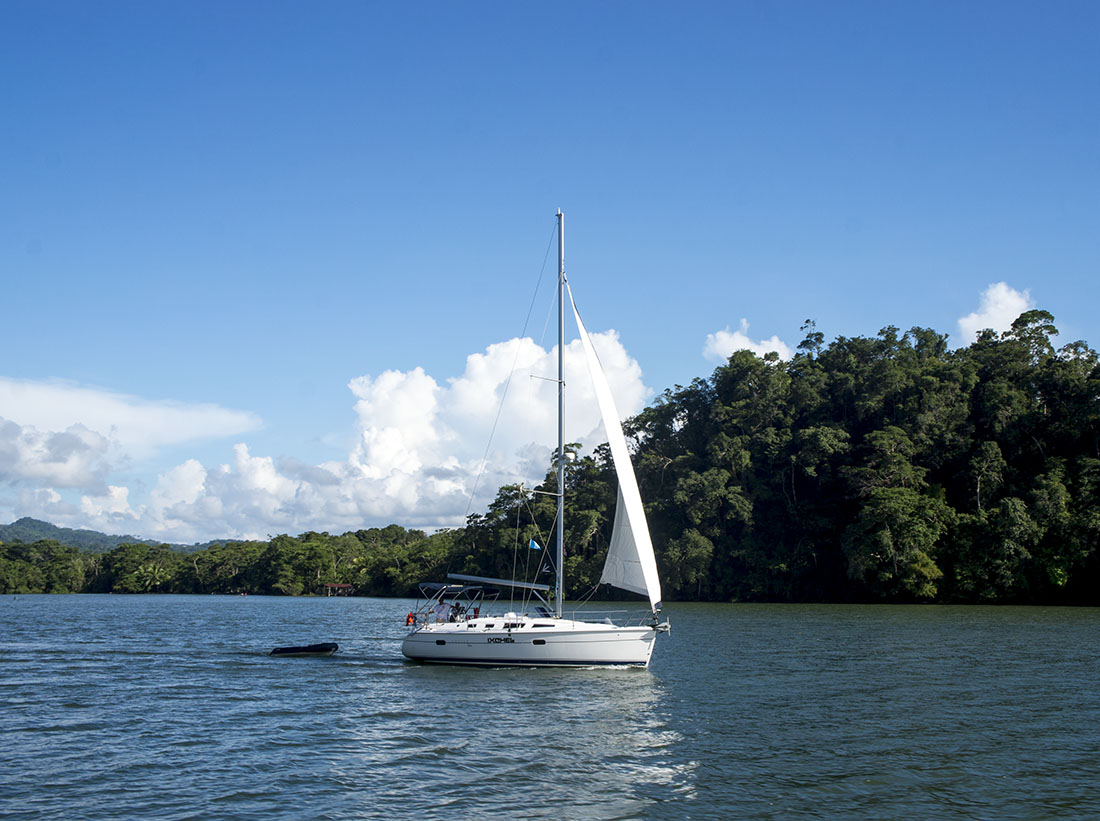
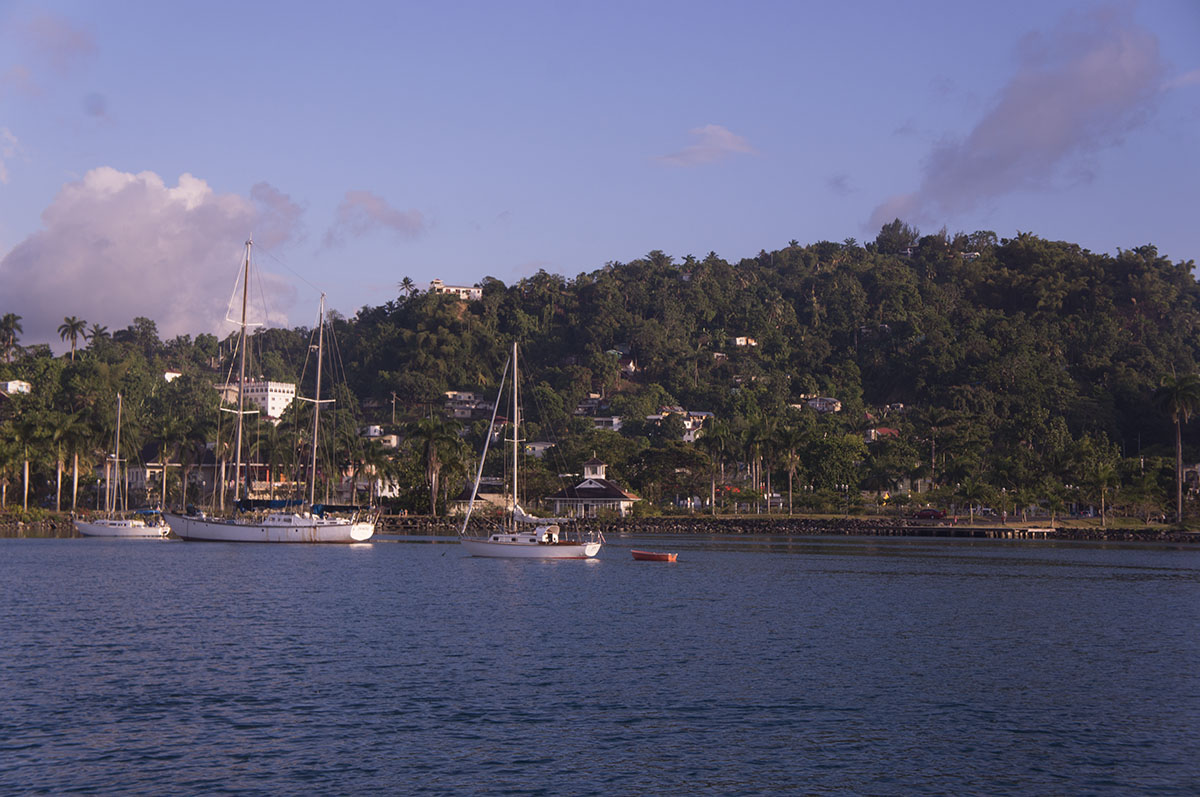
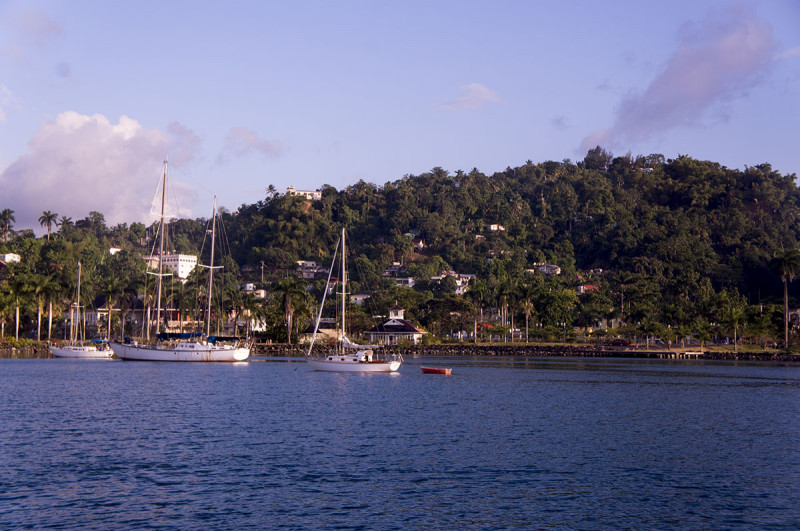
This is another one of my favorite shots, taken from the harbor of Port Antonio Jamaica.  This is how the shot appears SOOC, or straight out of the camera.

Jamaica SOOC

 Again, you can see that straight out of the camera it looks a little dull and cloudy.
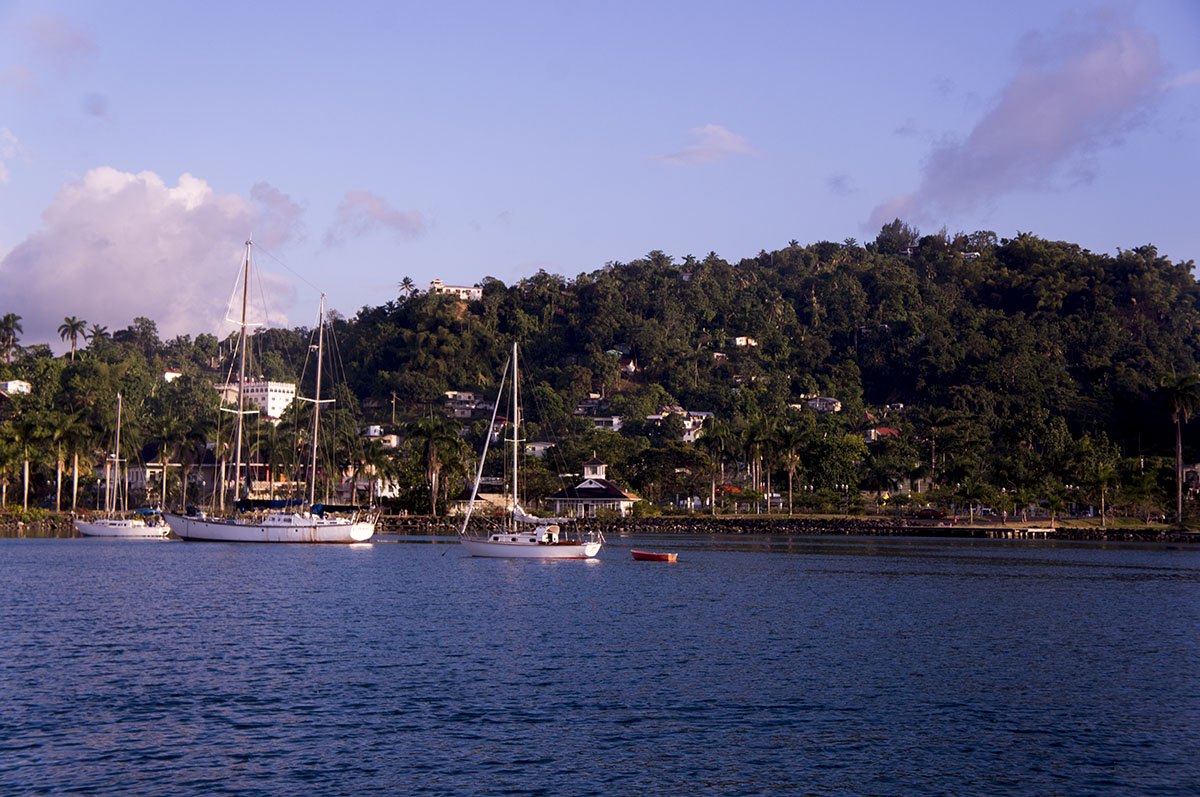
Jamaica edit 1

Edit 1:  Exposure: +0.50;  Blacks: -61;  Whites: +30

Jamaica edit 2

 Edit 2:   Shadows: -44;  Highlights: -31  Contrast: +9

Jamaica edit 3

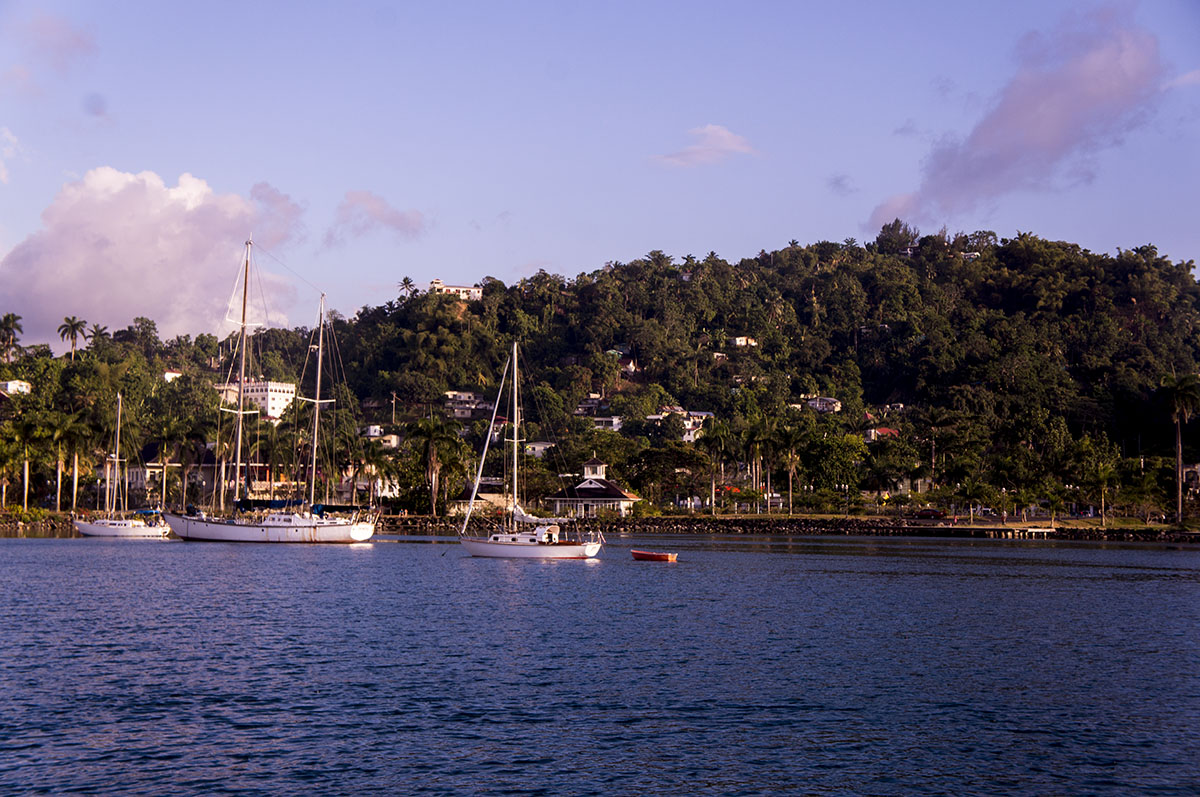
 Edit 3:   Clarity: +18;  Vibrance: +24;  Temperature: 6950 to 7800;  Color balance: +3 Red

Jamaica edit 4

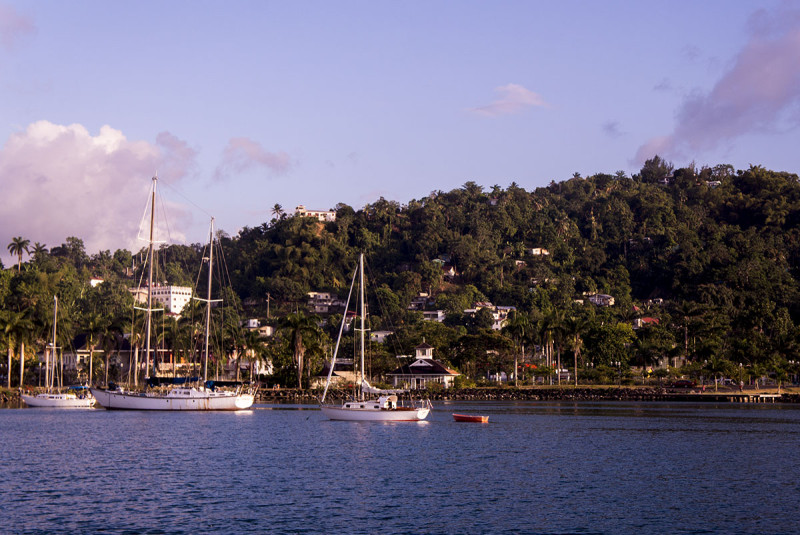
 Edit 4:  Canvas rotated .5 degrees CCW;  Spots removed with clone stamp;  photo cropped.

Jamaica histogram start

Jamaica histogram finish

So there you have it.  A simple and pain free way to quickly edit your photographs to give them a little extra oomph.  To edit these photos I used Adobe Photoshop CS6, but you should be able to find all tools listed above in any version of Photoshop.  Under my version of Photoshop though, all these tonal adjusters come up as soon as I open any RAW photograph.  If I am working in JPEG, I can find them under ‘Image’ and then ‘Adjustments’.

For even more of our photos that don’t make it on the website, make sure to Like us on Facebook!

curtain down

Get Back to Work!

Monday September 30, 2013

sewing cockpit shades 1

Have I mentioned that I can be a bit of a procrastinator when it comes to projects? Usually waiting until I have at least only 60% of the time necessary to complete the project before starting? This is especially true of anything to do with sewing since my sewing machine and I have never been on good terms and most of the time I like to forget that it exists.

Now that we’re back at Serendipity though, after six weeks of backpacking through South America (ok, so 10 of those days were spent in a comfy bed at Matt’s mom’s house in Michigan), we realized that we have about one month left of easy shore and electrical outlet access left, and it’s time to get our butt in gear on remaining projects. Matt has a whole lot of sanding ahead of him so he can finish varnishing the interior of Serendipity, but with the palm sander that was lent to us back in the hands of it’s owner for their own use, he has to put that project off until we can buy our own at a little hardware store in town. Something that we go in every day and ask for, only to keep getting the same response of “Mañana”. So now he’s focused his energy back on the project of reconfiguring our dining room table so that it will sit more compact with the mast and give a little more room in the salon (yes, that will be shown as well once it is completed)/

He’s busy with that, which means I have to get my own projects done too. All of which are sewing related. Excuse me one moment while I curse under my breath (son of a &%$, stupid sewing machine, I hate that piece of $**&). Ahem. Ok, I’m back.

My project is something I have been putting off for pretty close to one year now. Last October when we were in Washington D.C., we had a roll of perforated Sunbrella fabric shipped to us so that I could make shades for the cockpit. It didn’t take long for us traveling to realize that early in the morning or later in the afternoon the sun would no longer be hidden by the bimini, and would come glaring in at us in the cockpit. During travel days the extra heat could be a killer, and at anchor it could be annoying to try and cuddle up with a book (or a laptop) without going blind. Something had to be done.

So now, 11 months and two weeks later, I am finally pulling that fabric out of the aft cabin to turn it into what it was purchased for. The whole thing (pat myself on the back) actually turned out much simpler than I had originally anticipated. Part of it may have been because there was a large floor for me to spread my fabric on to measure, and a table that was not rocking back and forth while I fed the fabric through the sewing machine, but within two days I had it completed, and pretty nicely if I do say so myself.

The first step was to take the measurements. We only had enough fabric to hang down from the top of the bimini to the lifelines, so I needed to find the length and width in which I would be measuring and cutting the fabric into. Since there is a slight arch to our bimini, mostly by the stern, but a little bit on the sides, this took a little extra step. I had to run a piece of string that was level from one side to the other. From there I measured down to the lifelines to get a general rectangle measurement. To add the arch to the top, I measured from the bimini down to the piece of string every six inches, all the way across. When I was finished, (after three double checks, I was not going to get this wrong) my measurements looked something like this: 83” wide, 18” long; 6” in: add 2”; 12” in: add 3.5”; 18” in: add 4”; and so on.

Once I had my triple checked measurements down on paper (and good thing I did it three times, there was a little bit of variation each time) I took the median number and used that. Rolling my fabric onto the floor of the ranchito, I then pulled out my white marking pencil and got busy making an outline of my measurements. First was the general rectangle. Then for the arch, I placed a line where each 6” measurement was taken. To then transfer a nice arch to the fabric, instead of having jagged straight lines from one mark to the other, Matt helped me as we took one of our fishing rods and bent the pole to cross over each mark, which I then followed with my pencil, fully outlining where I needed to cut.

Had I needed to make seams to finish the edges, I would have then measured 1/2” out from those lines, making dashes every few inches that would have been my cutting line. I didn’t need to worry about finished edges though, so I just cut along the lines I had drawn.

Then came the time consuming part of the project. I didn’t need to finish the edges, because I was using piping around them. Pulling the piping out of it’s bag, I measured each side, and then cut the piping and pinned it to the fabric. Just to break up the days a little bit and make them more interesting, I alternated by sewing one of the (port, starboard, stern) sides each time I finished pinning it. I was worried that my little Brother sewing machine wouldn’t be up to the job of sewing through semi-thick piping, but she handled it just fine. There was barely any cursing on my part. I did find out that I have an issue with the tension in my bobbin, but after doing a little research, I think I have to take it in to have that fixed.

Two days of work and not much trouble later, I finished my project. I handed the sheets of fabric over to Matt so that he could add the grommets, and now they are hanging from our bimini, giving us some extra added privacy in the marina. Are they perfect? No, not really.  There’s little spots here and there where the stitching isn’t perfect and the grommets were added in the ideal location, so a little extra string needs to hold them up.  Do they work? So far, so good. Once we get some snaps on our hands I’ll have to make a few pieces of fabric for each side so that we can roll them up and snap them in place when they’re not in use, but for now we can just use strings to tie them up, or take them down. Whew, there’s one thing off my plate. And I have to say, I’m actually quite proud of myself.

sewing cockpit shades 2

sewing cockpit shades 3

sewing cockpit shades 4

curtain down

curtain tied