clothing cabinet in salon

Making Clothing Cabinets

Tuesday August 25, 2015

clothing cabinet in salon

I remember when I thought that when the time came to begin making the cabinets it would be the easiest job in the world compared to the walls.  The walls were at odd angles in which we had to follow the curve of the hull, but cabinets are mostly straight and should be incredibly easy, right?

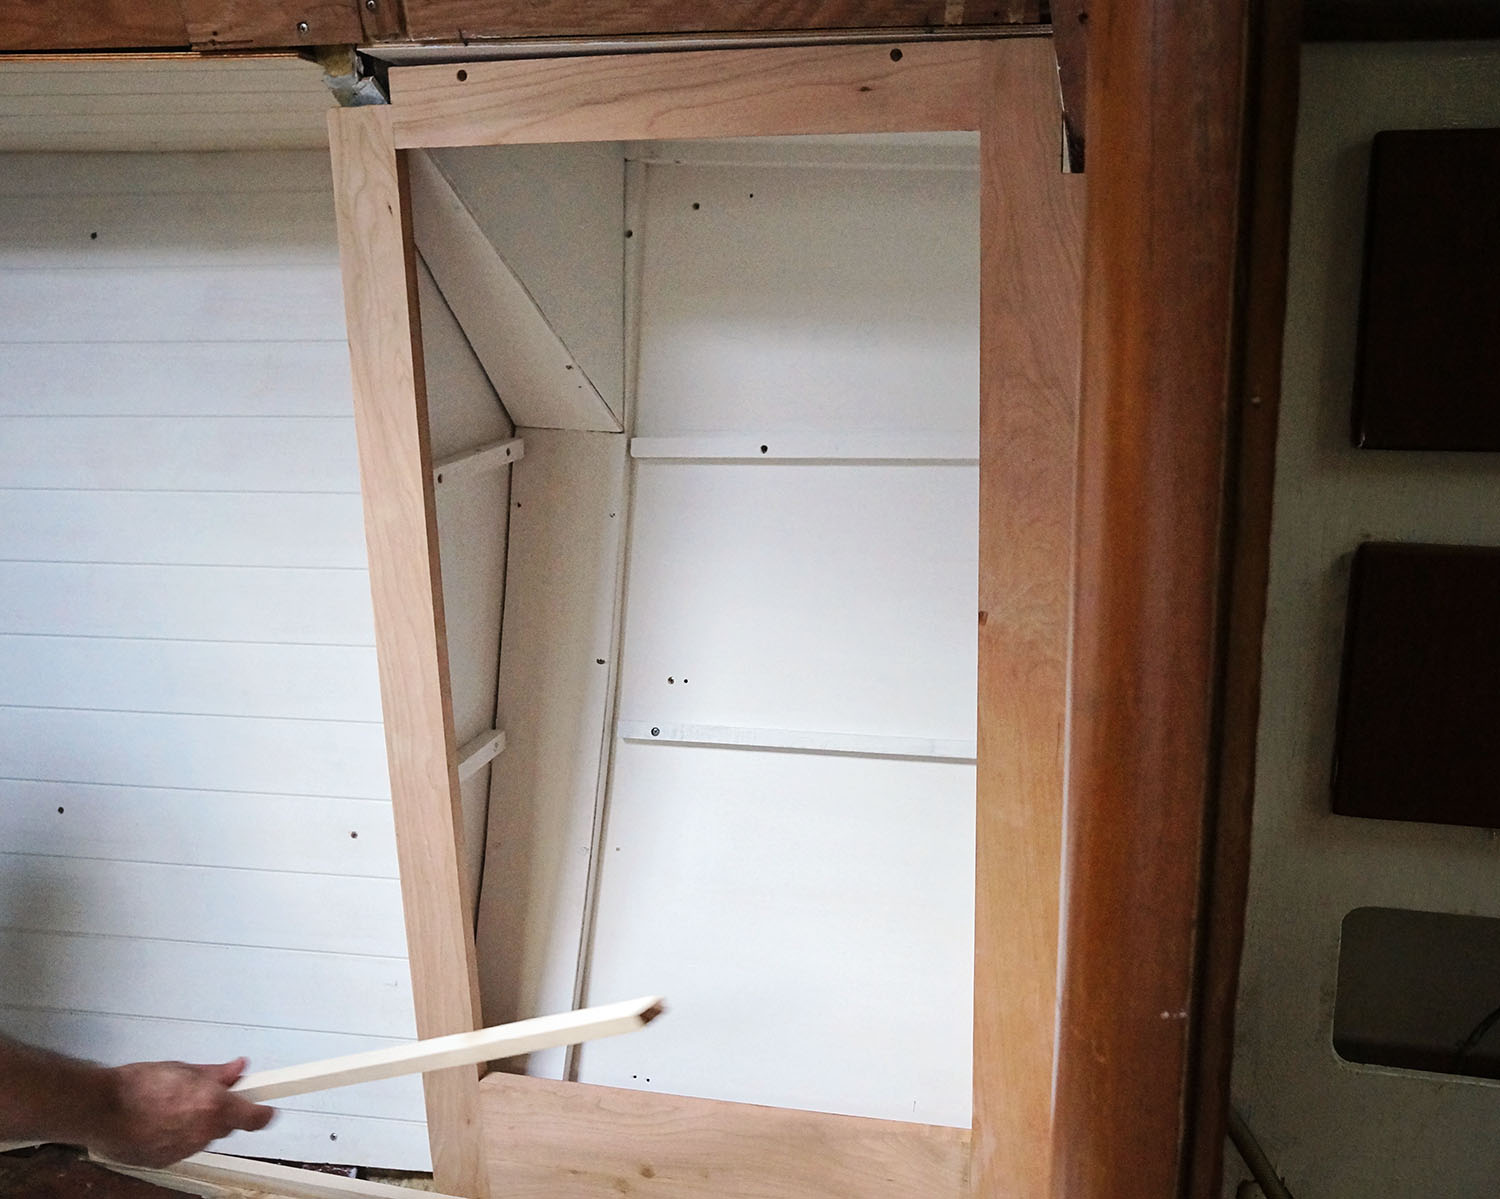
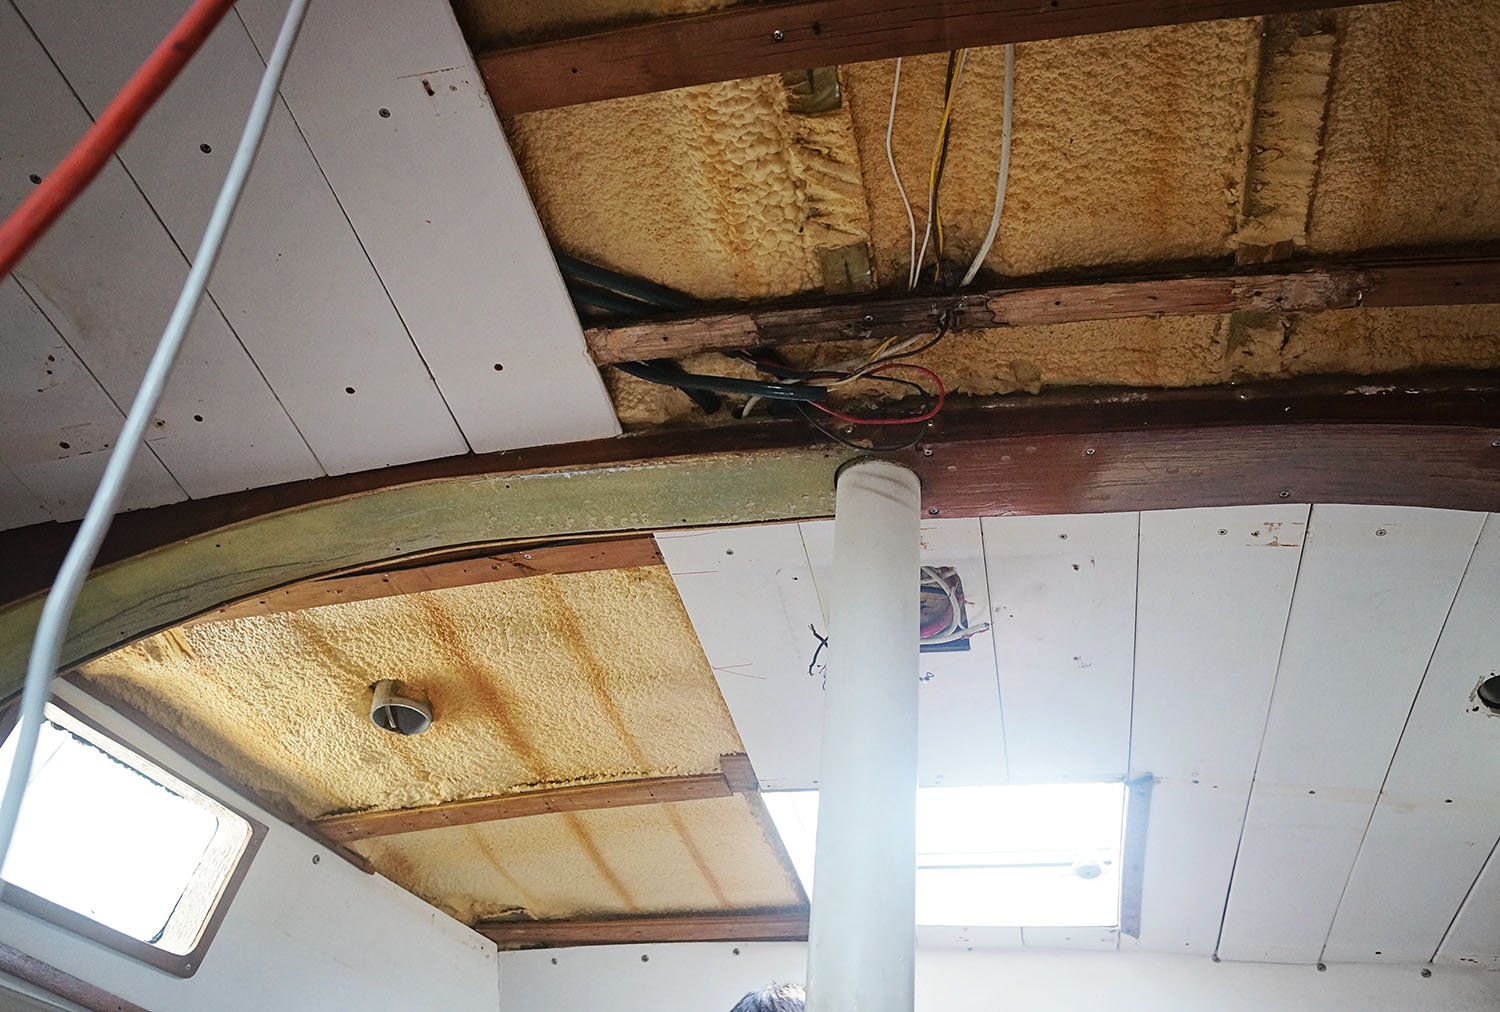
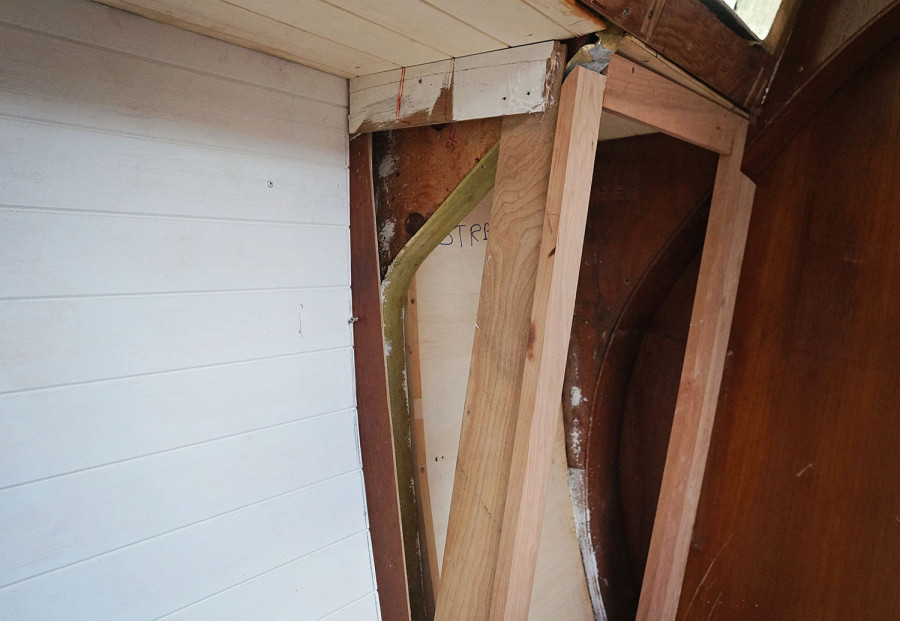
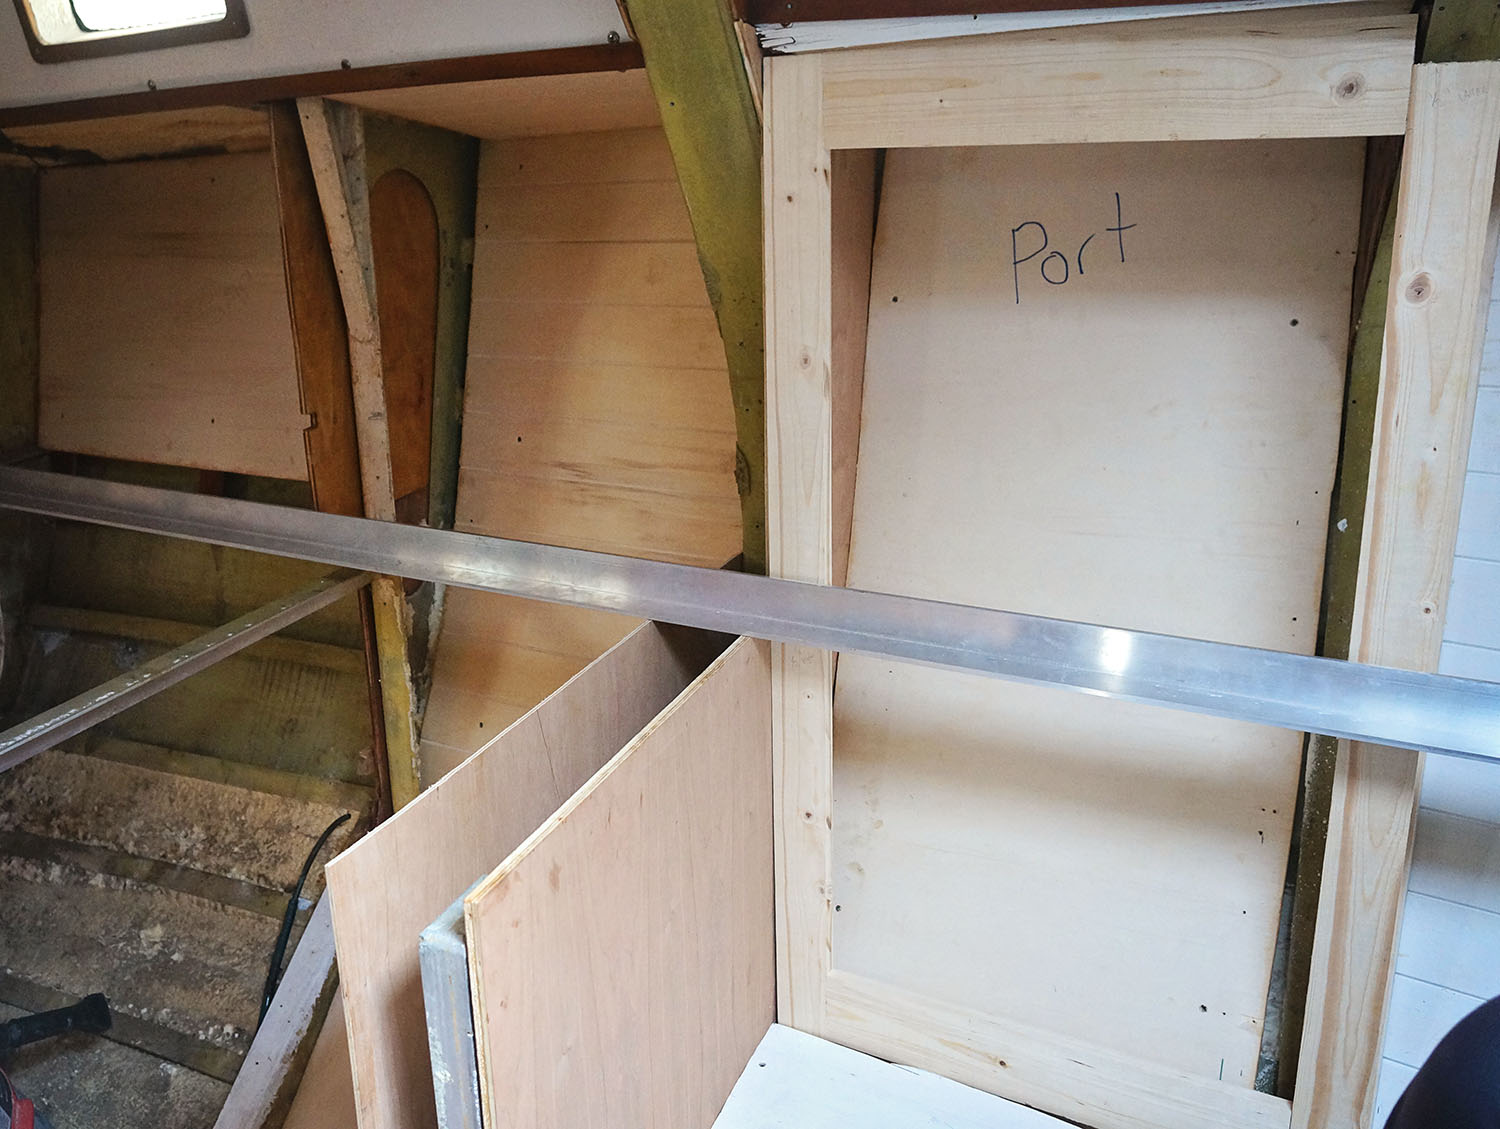
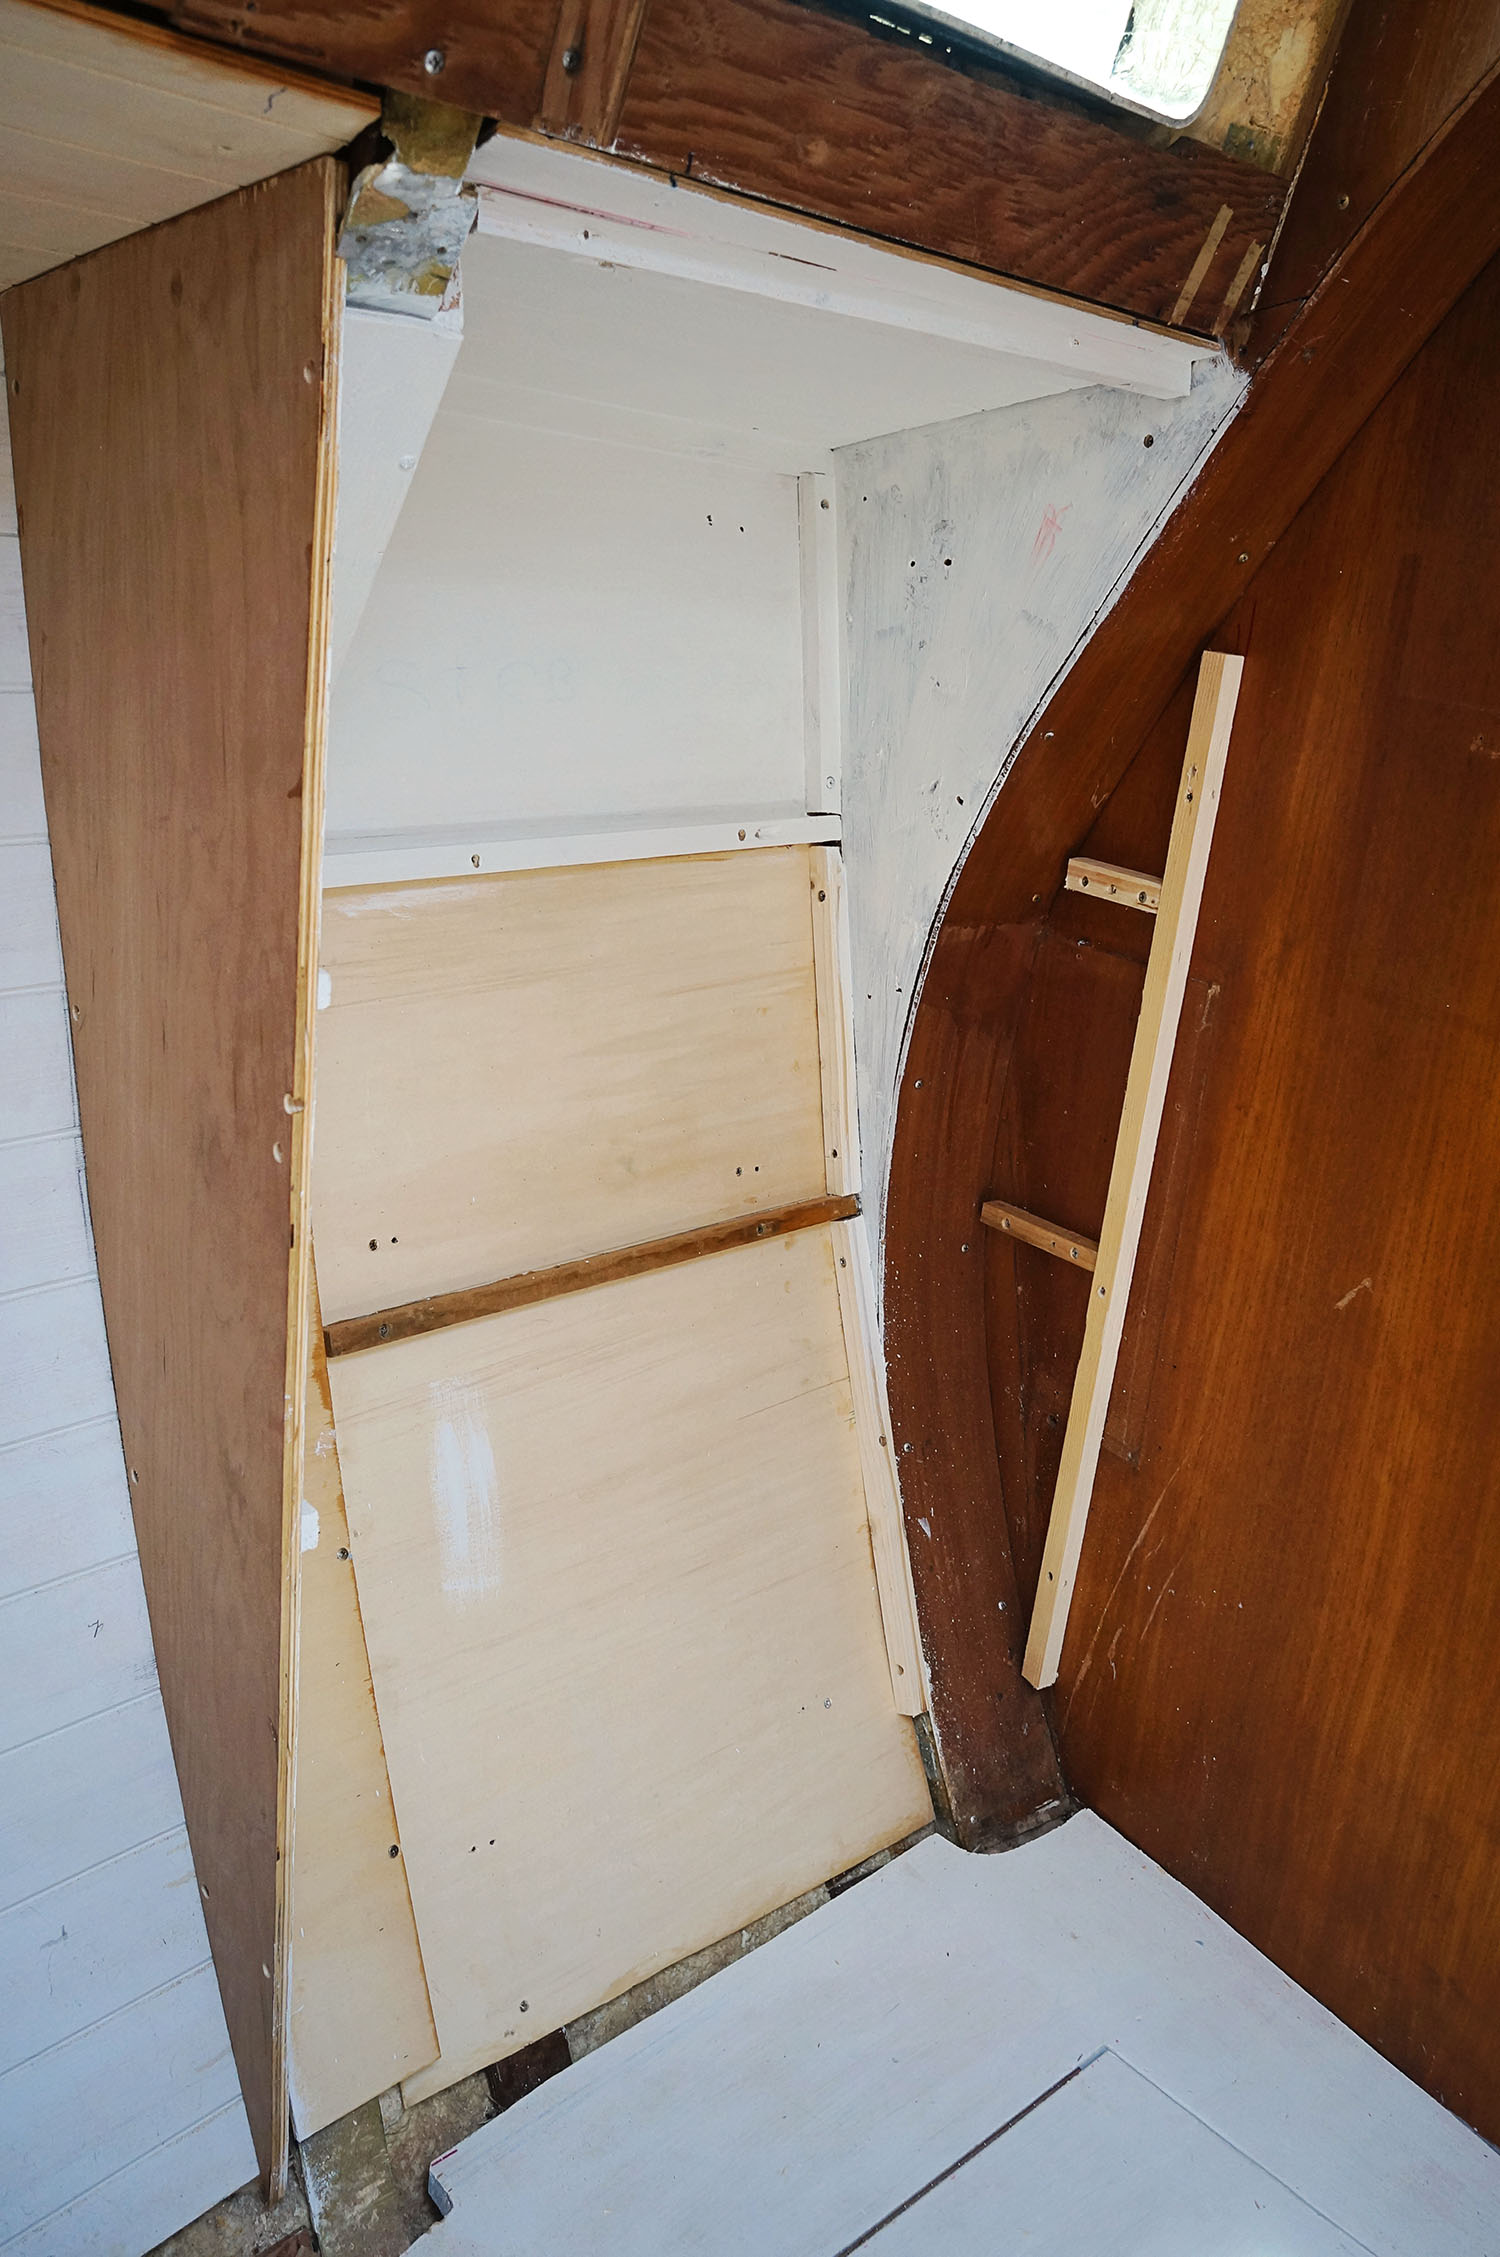
Nope.  I’m not lying when I say this is pretty much the only thing we have been working on for the past two and a half weeks. Two measly clothing cabinets in the forward salon and they are taking an eternity to build. It’s not making the frame or even perfecting the curve for the side that does butt up against the hull that is draining all of our work hours. Our two major downfalls on this project have been trying to get everything absolutely level and lined up, as well as finding crafty ways to cover up the piece of aluminum frame that juts out into our cabinet space.

I shouldn’t say all of these are working hours, however.  A lot of them are contemplation hours.  With a few trial and error tests here and there.

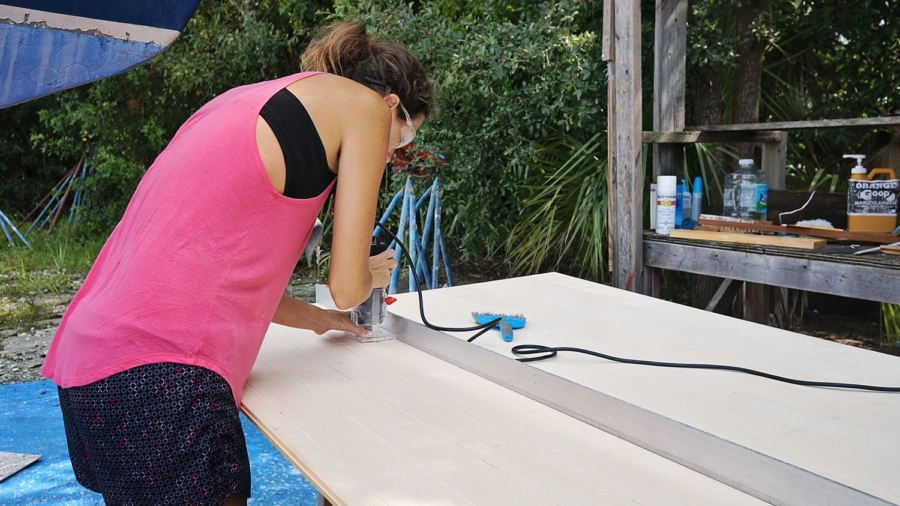
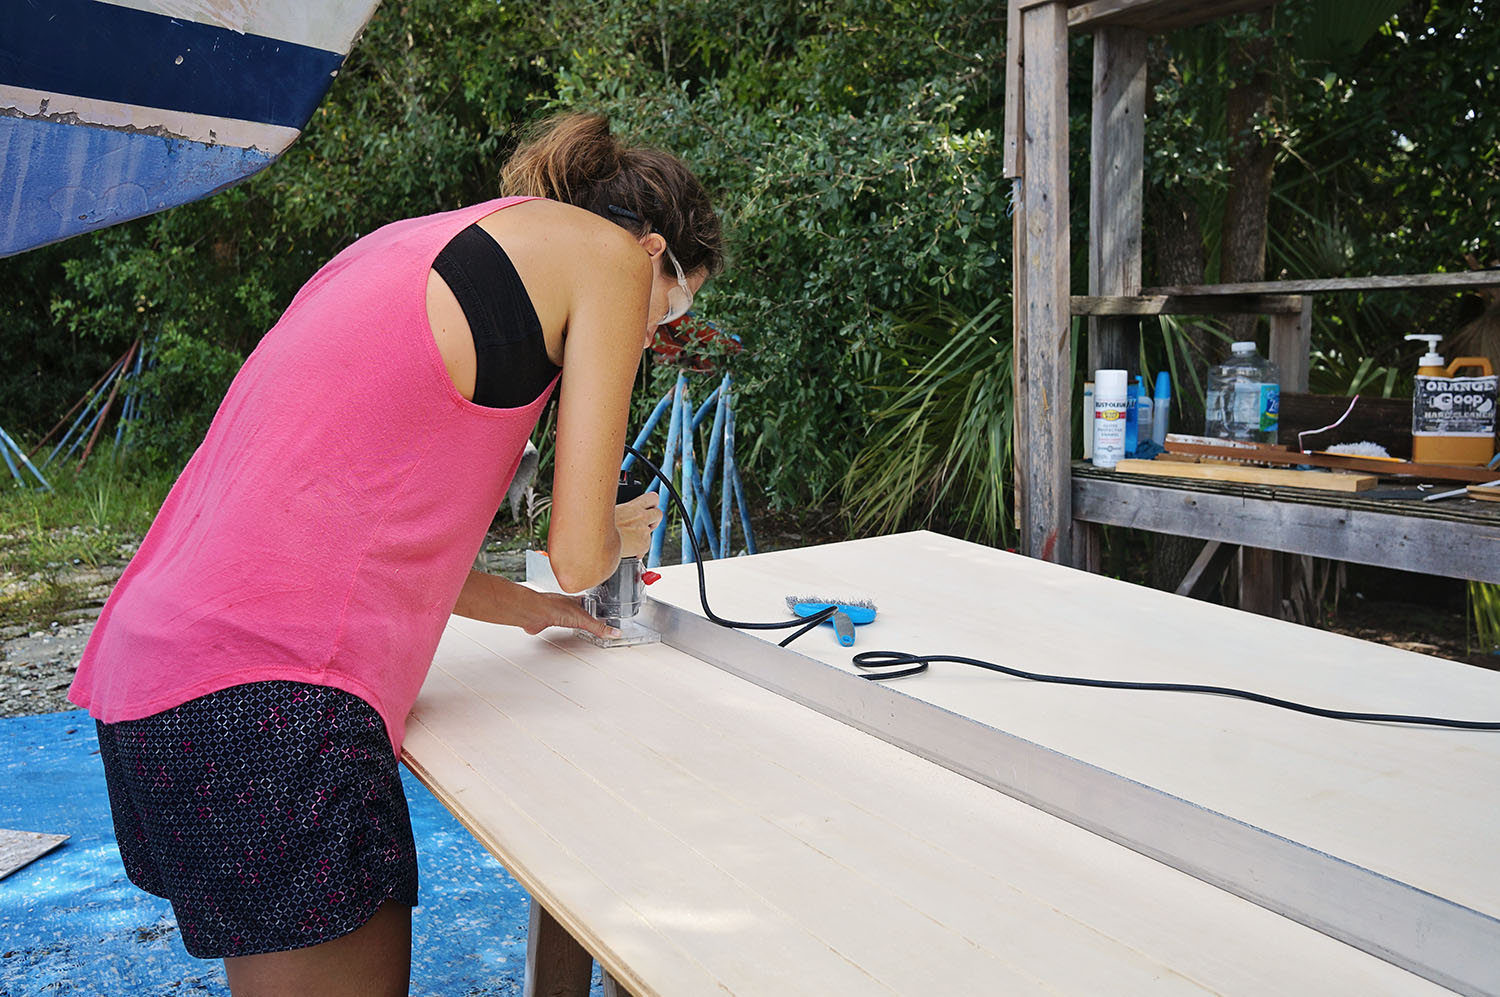
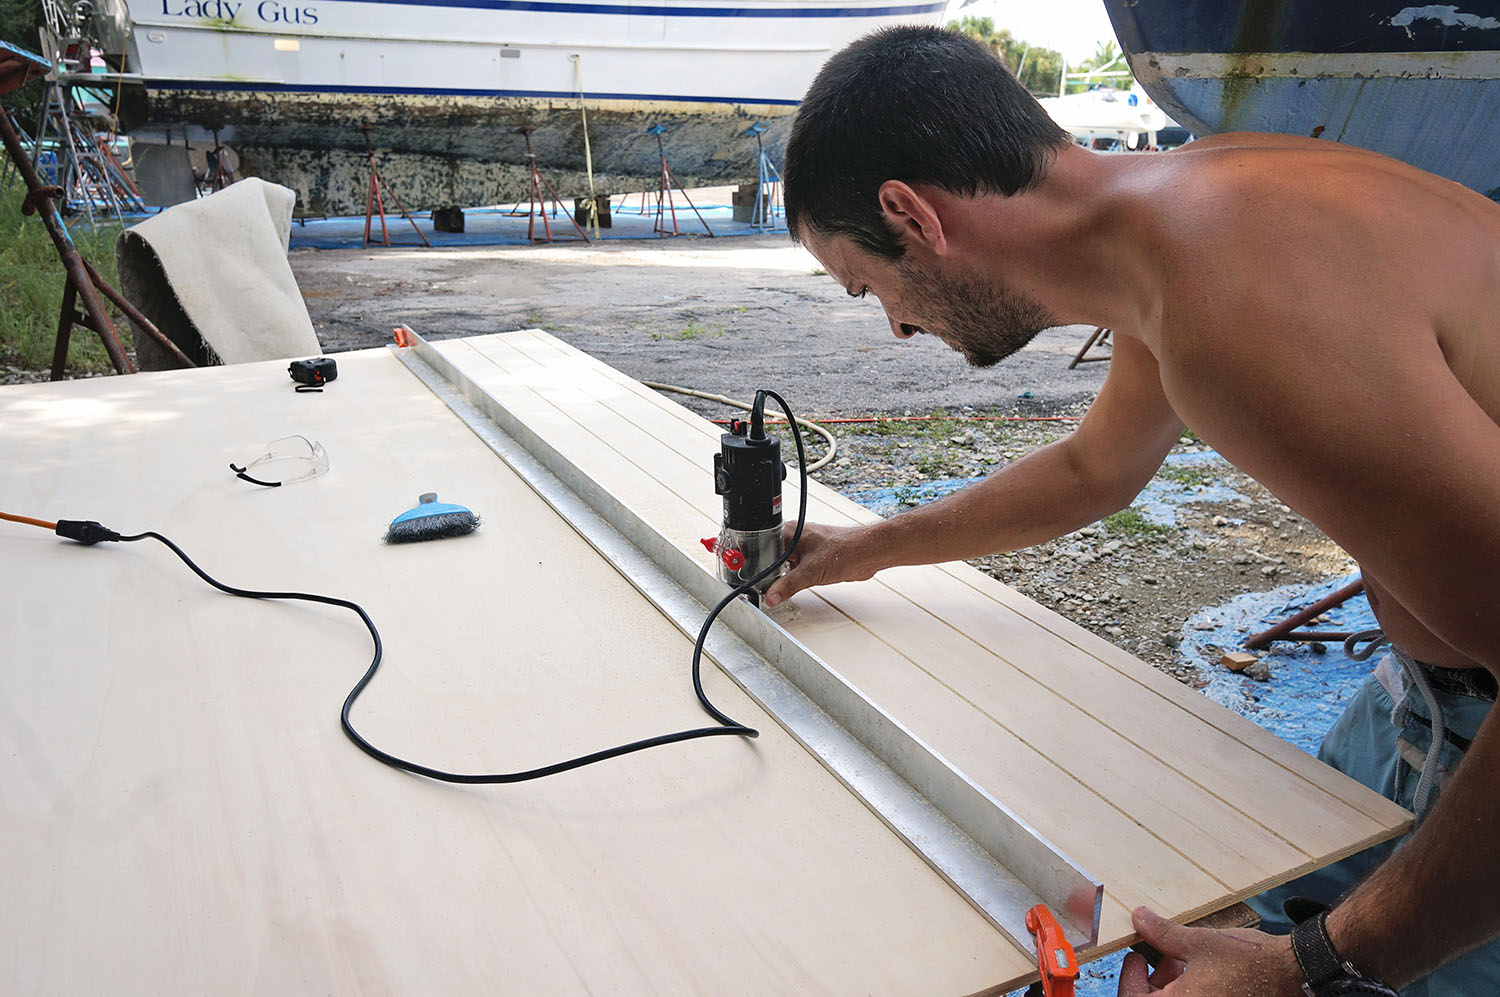
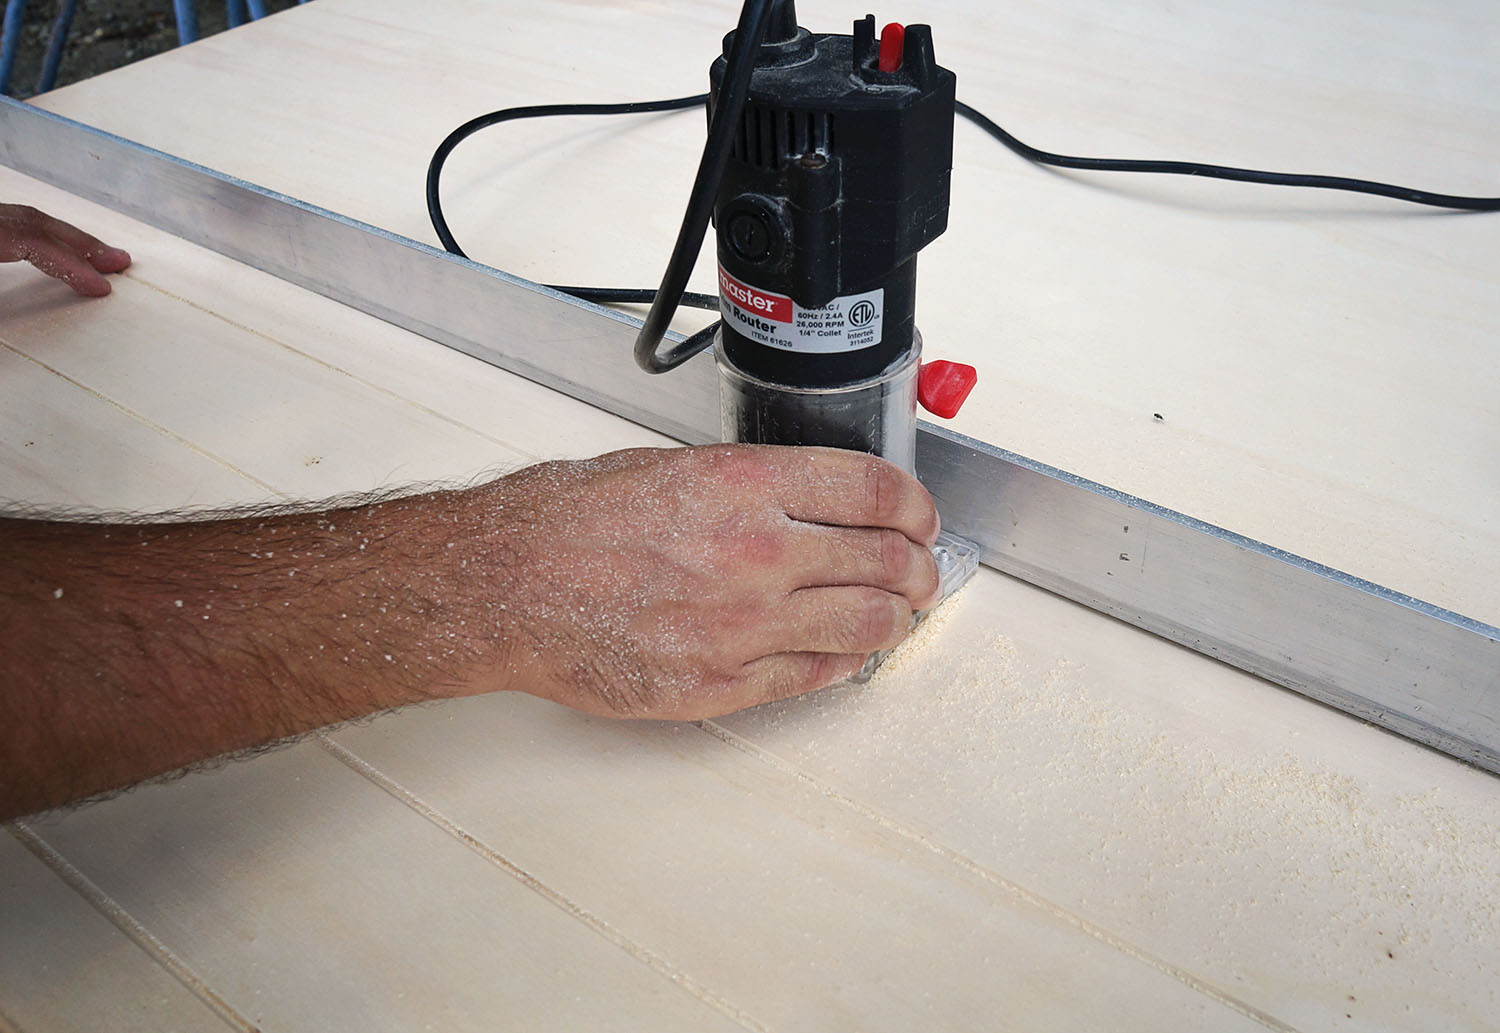
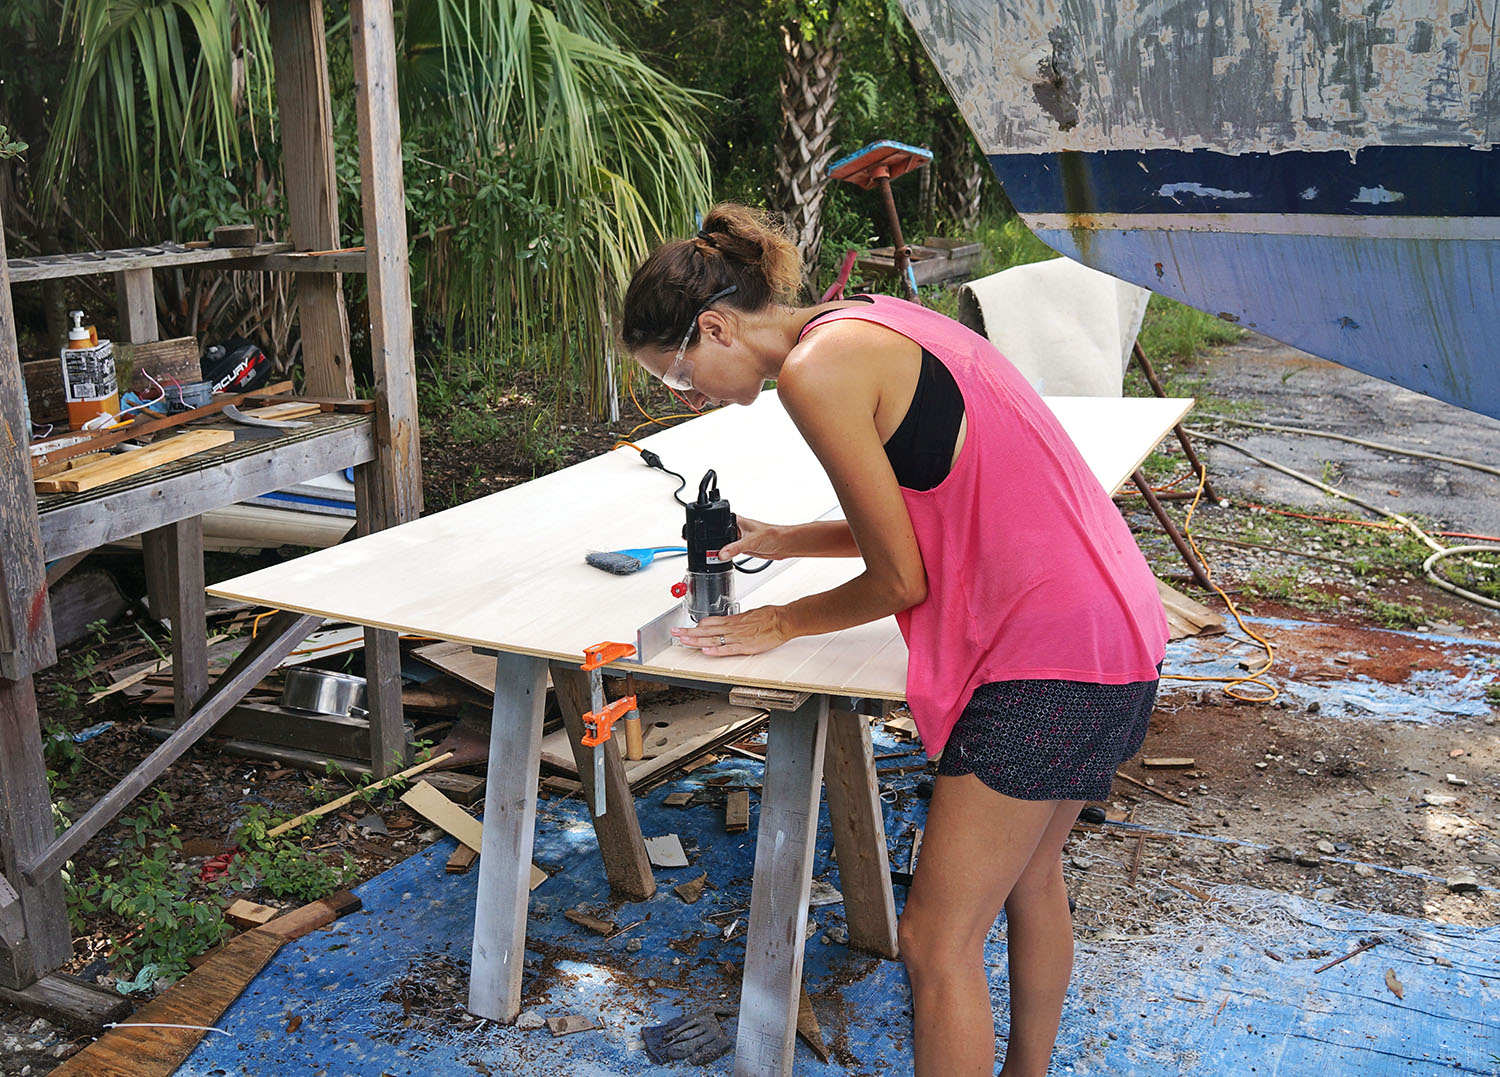
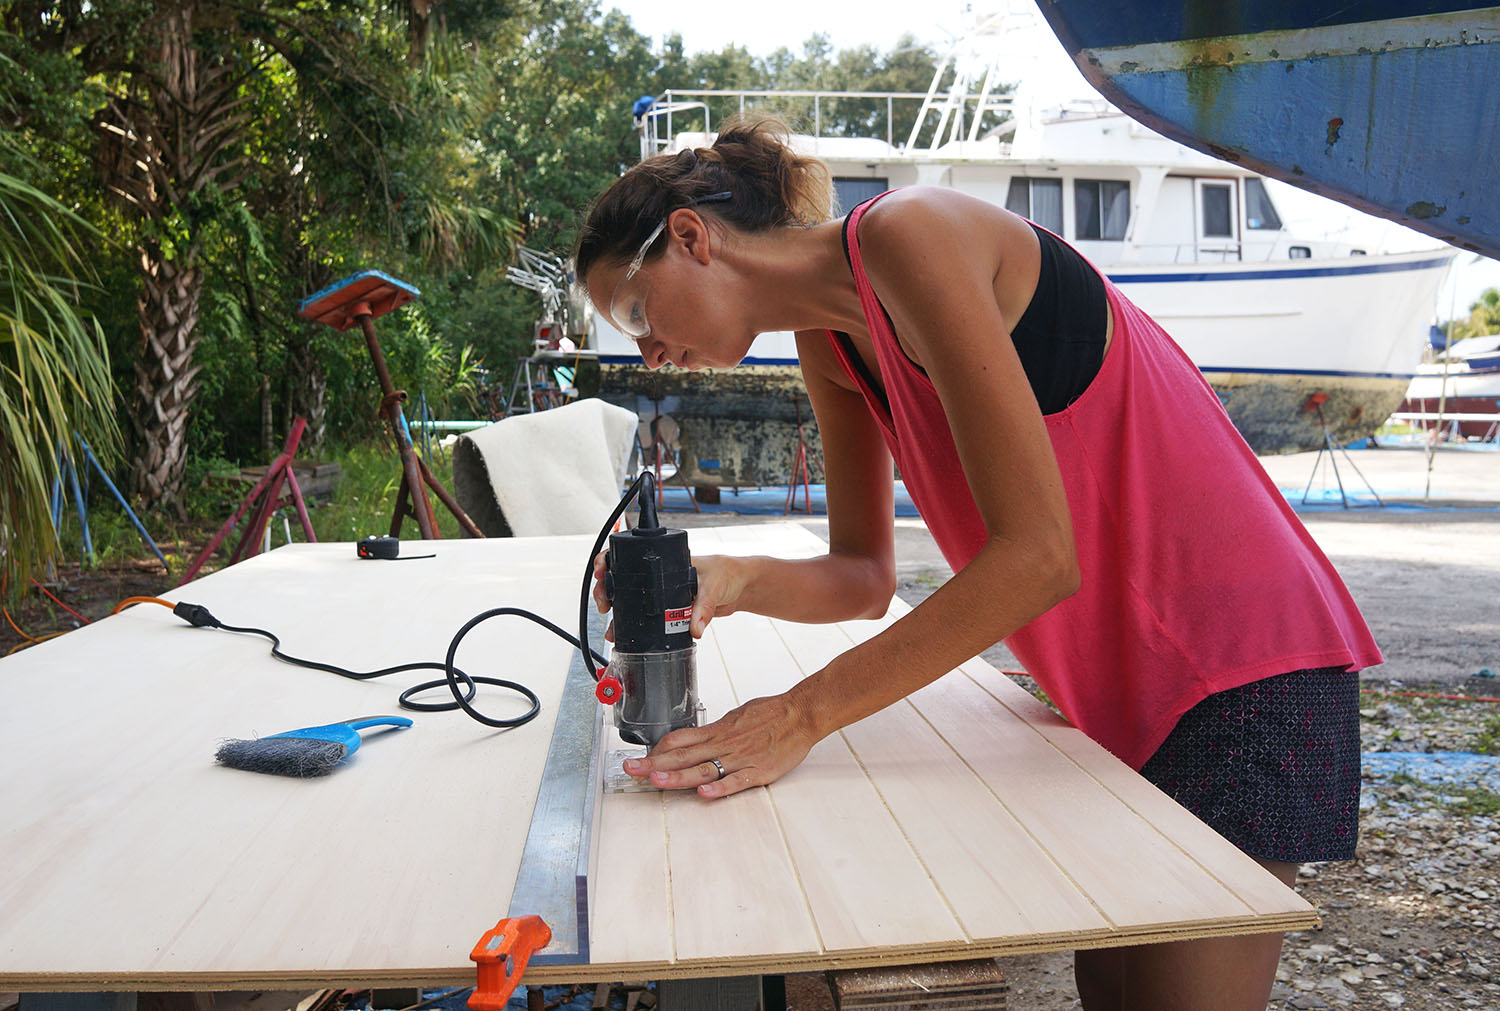
Covering the aluminum frame still has us dumbfounded where there is a 2″ section that sticks up above the cabinet frame, but inside will just have to be a lot of specially cut and placed pieces of Eurolite (like we saw on their website here). Although the part of getting the cabinet frame lined up as we’d like it is proving quite tricky too.  We’ve decided we’d like the boat to flow together as much as possible, meaning if possible, we’d like to keep a linear line from where the pantry cabinets start at one end of the galley and ends with our clothing cabinets in the forward salon. Since we’re working with a space that curves in and grows smaller the further forward you reach in the boat.  Luckily our aluminum straight edge we’ve been using for routing is long enough to span this area and helps us to find the correct angle we need for the cabinet frame.

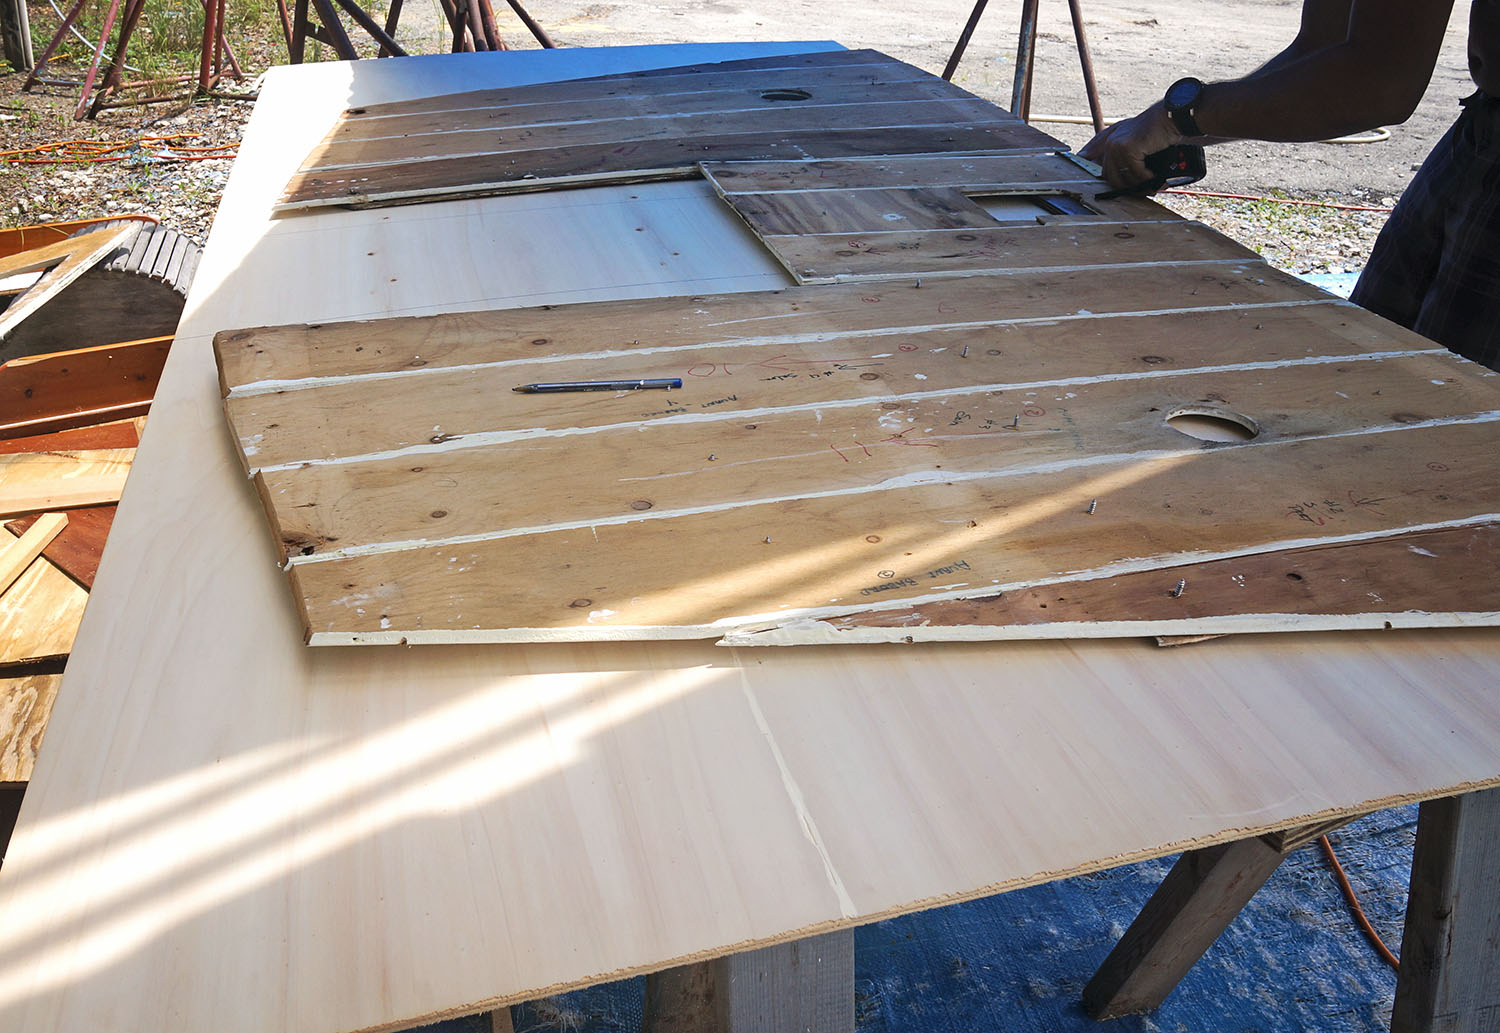
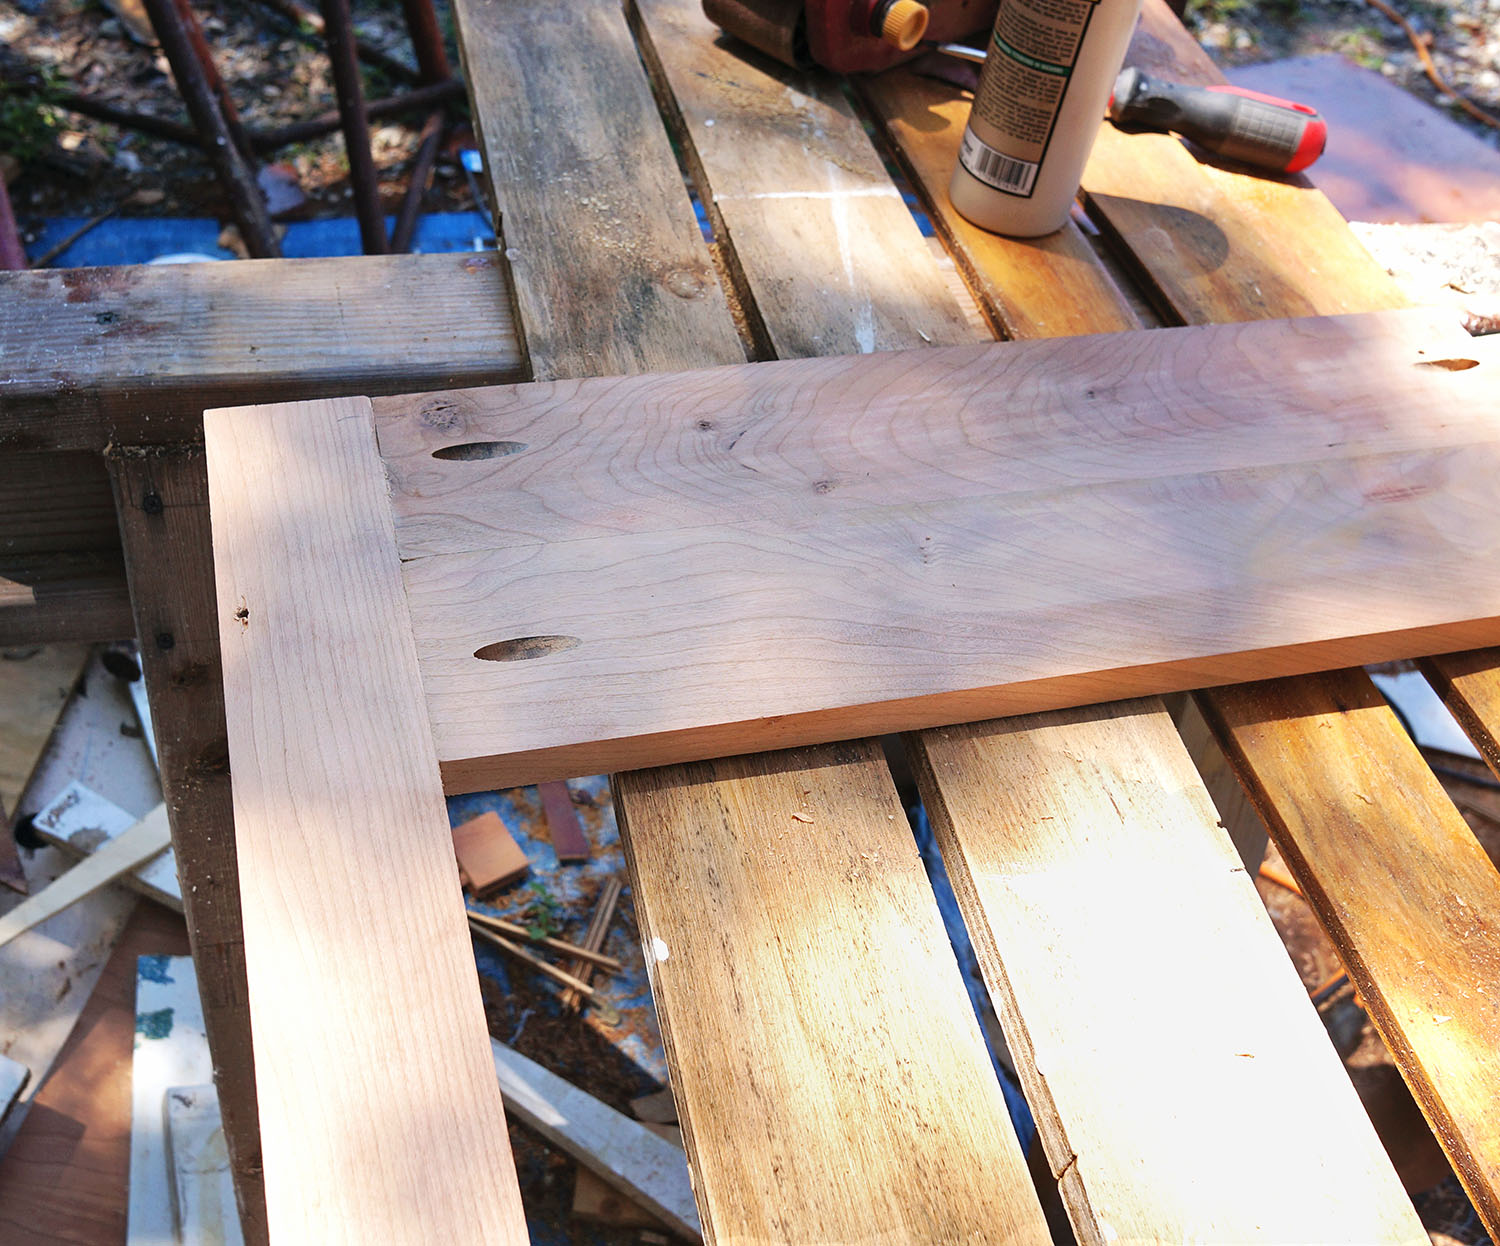
Once we had decided how far we wanted the cabinets to come out into the salon it was time to make the frame.  Rather than waste our precious hard wood cherry on the learning process we picked up some pine from Home Depot to do a few test runs on.  Items like checking the measurements, how the pieces come together, and most importantly, how to work our new Kreg Jig K4 Pocket Hole System.  As the name implies, it creates pocket holes so that the screws run in the back sides of the boards without ever showing on the front.  Even though we’ll still be using the tongue and groove format for the doors of the cabinets, this was a much easier way to do the frame.

framing clothing cabinet

pocket holes using Kreg Jig

Who knew we’d ever be so happy to going back to templating pieces of wood.  Once the frame was in place we needed the pieces of 1/4″ cherry plywood that will serve as the side.  Using our compass we traced the curve of the hull onto one of our scrap 1/4″ strips of wood and cut it down until it fit perfectly in place.  The other two lines were straight enough that we could overlap them onto the first, giving us the edges we needed, before being glued together.  Tracing that template onto our cherry ply we had our side within about 30 minutes.

templating the side of cabinet

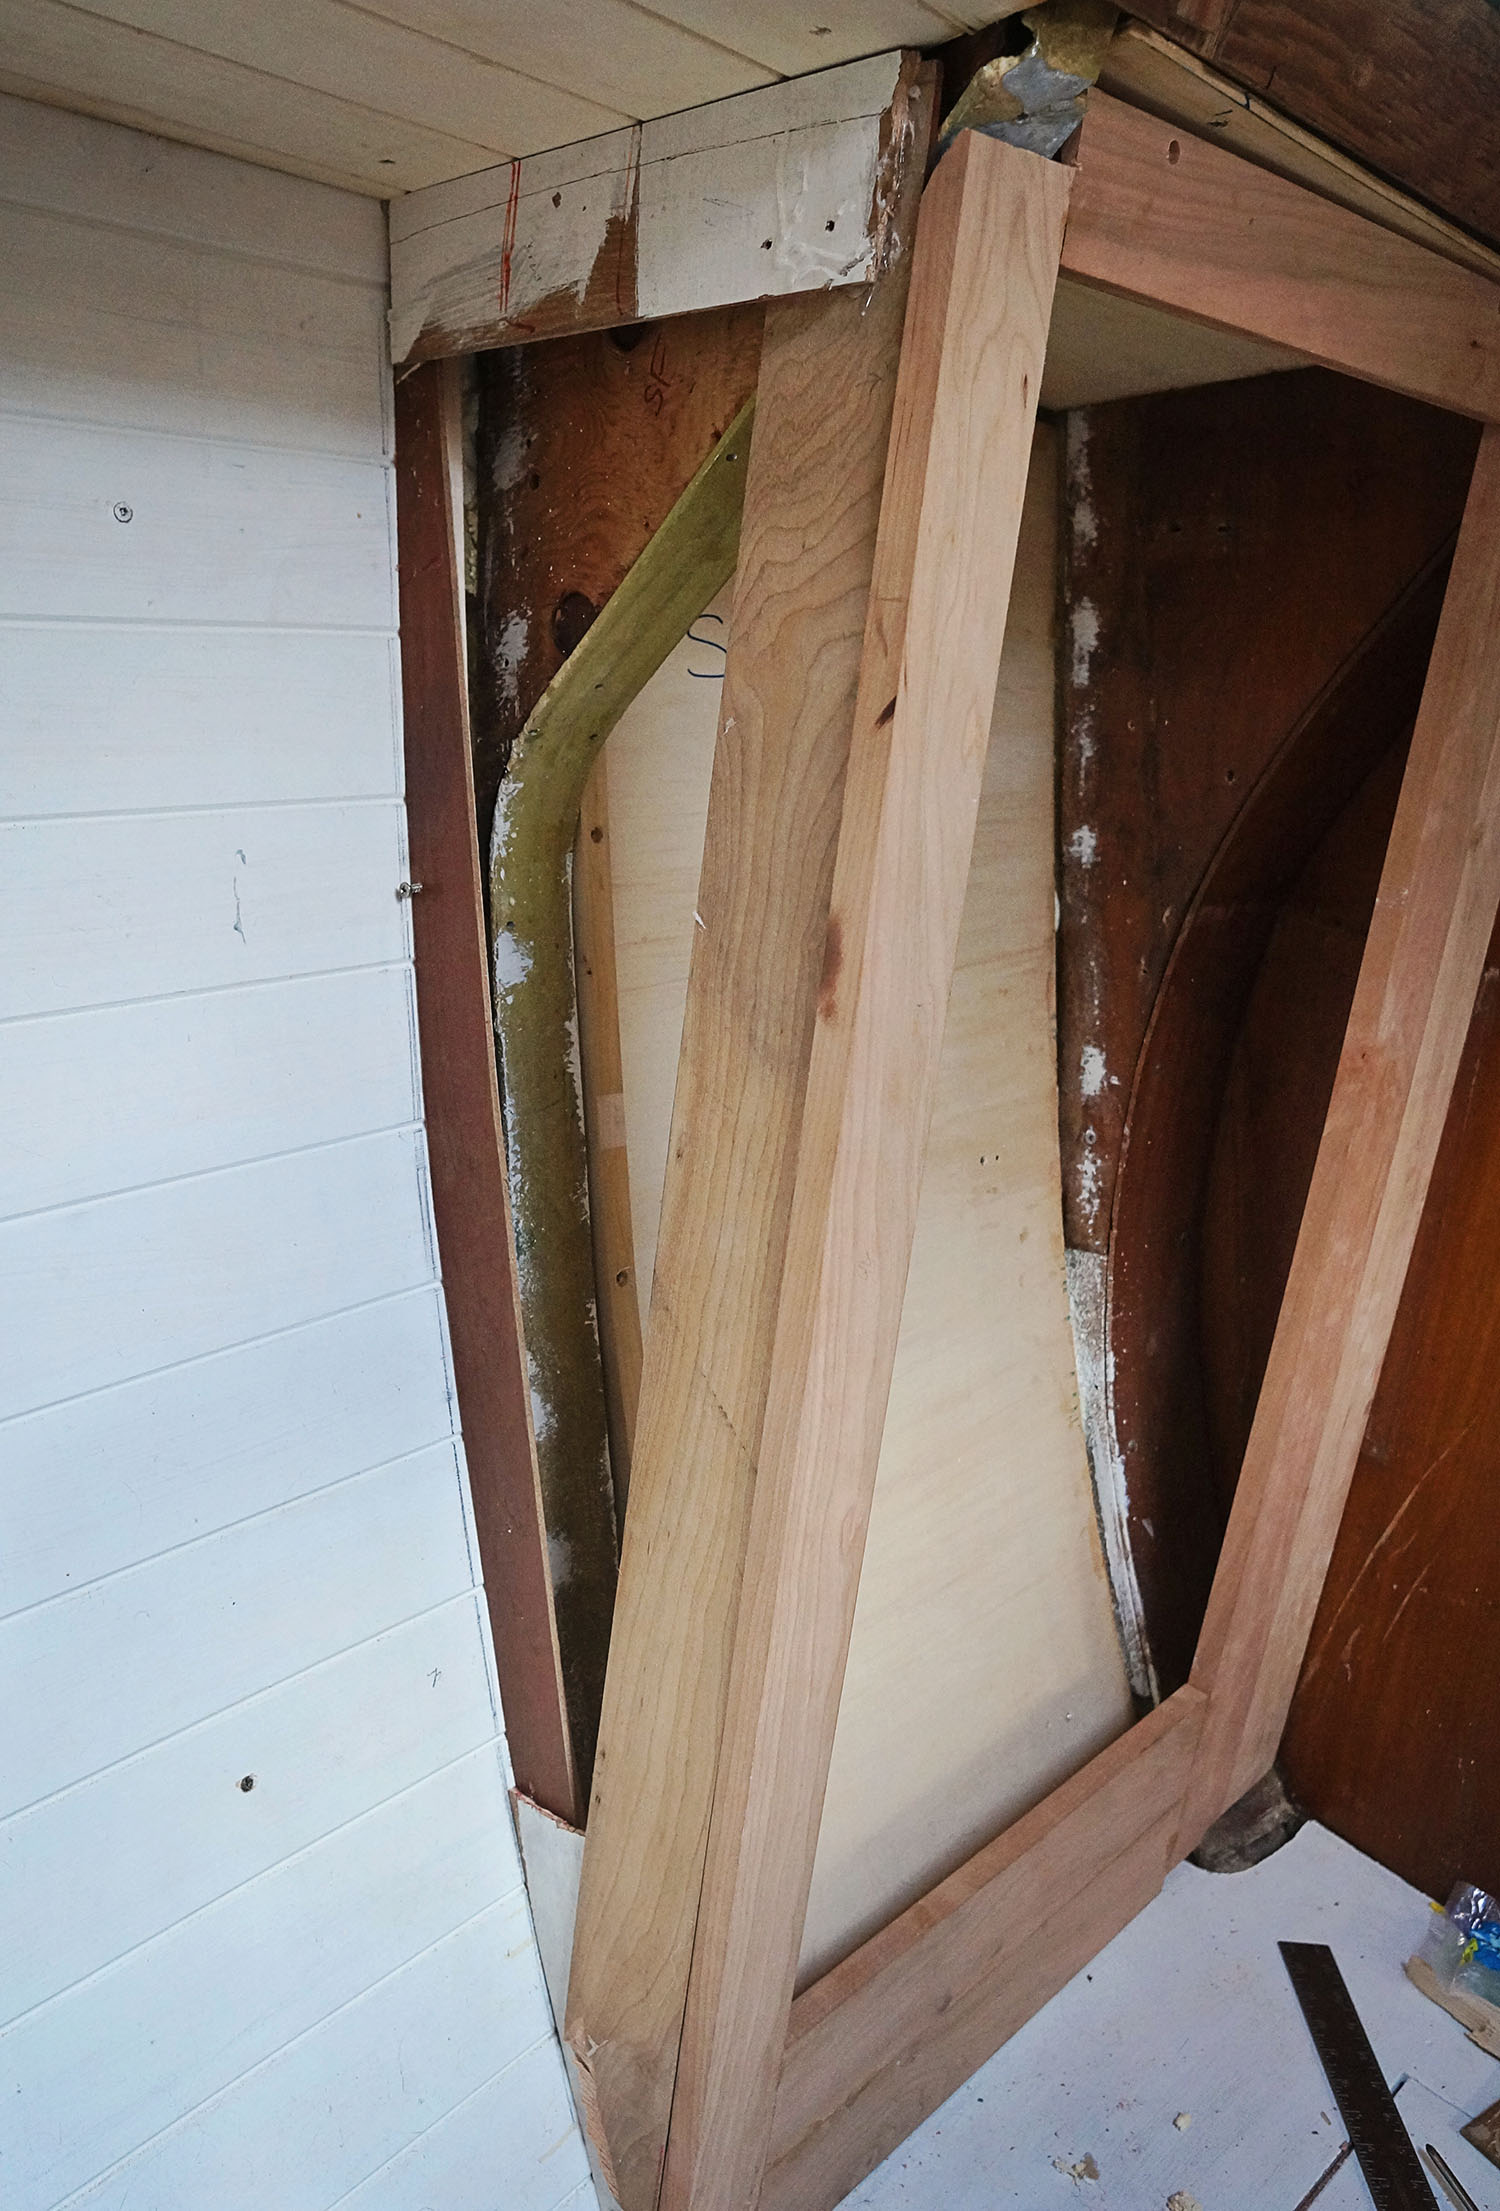
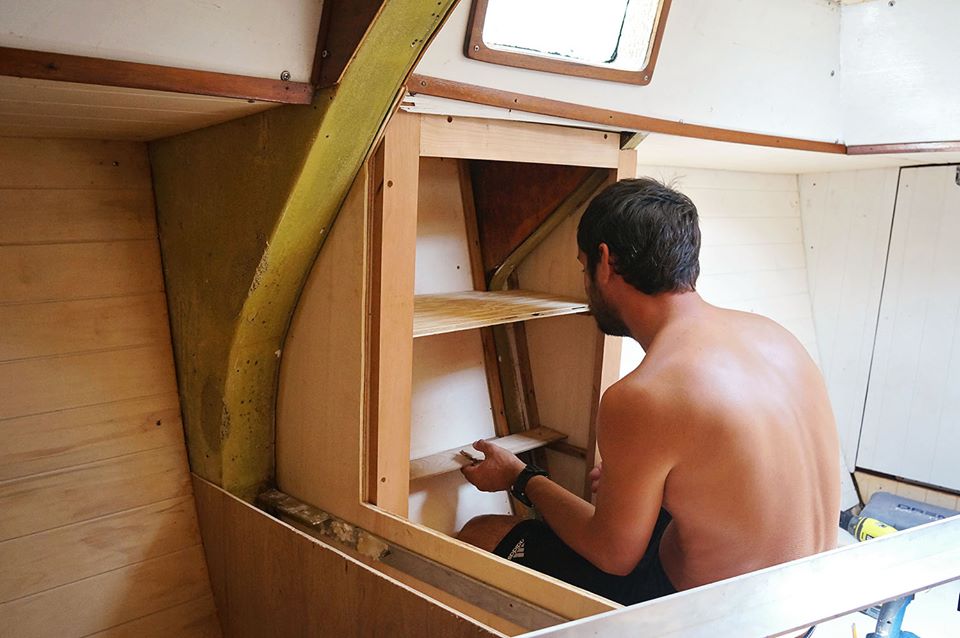
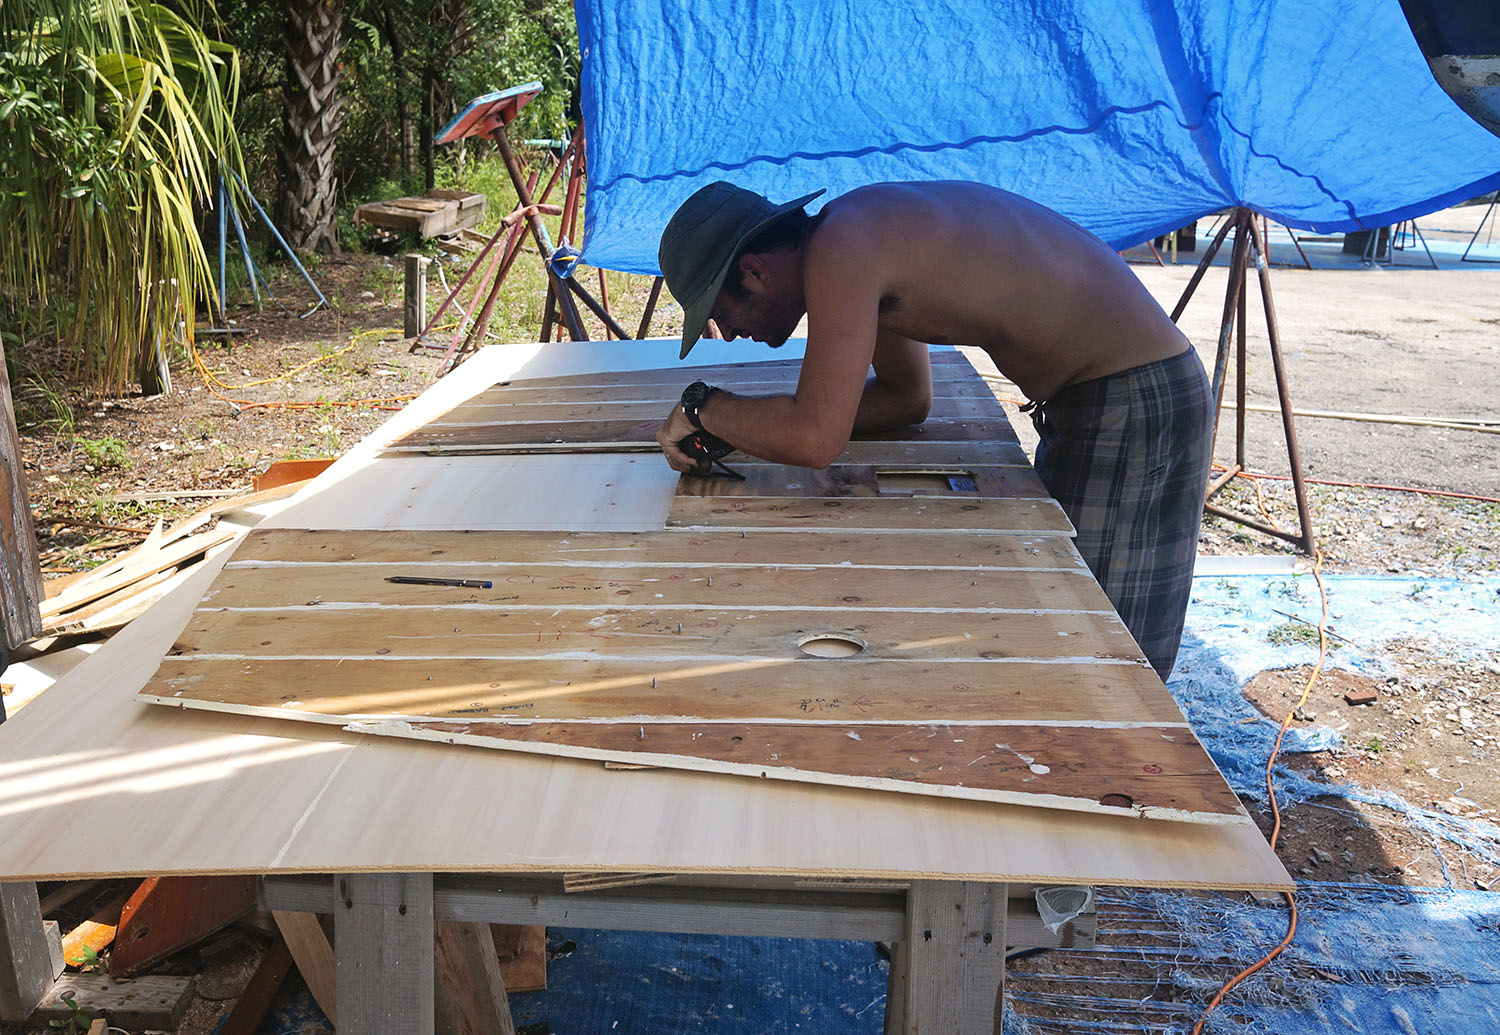
To give the cherry plywood a little extra strength and stability we also added a piece of Eurolte to the inside and gave it a coat of epoxy since it will be attaching to an aluminum frame.  Cutting a few more strips of Eurolite we covered the remaining frame on the inside, and added cleats to place the shelves on top of.

building inside of cabinet

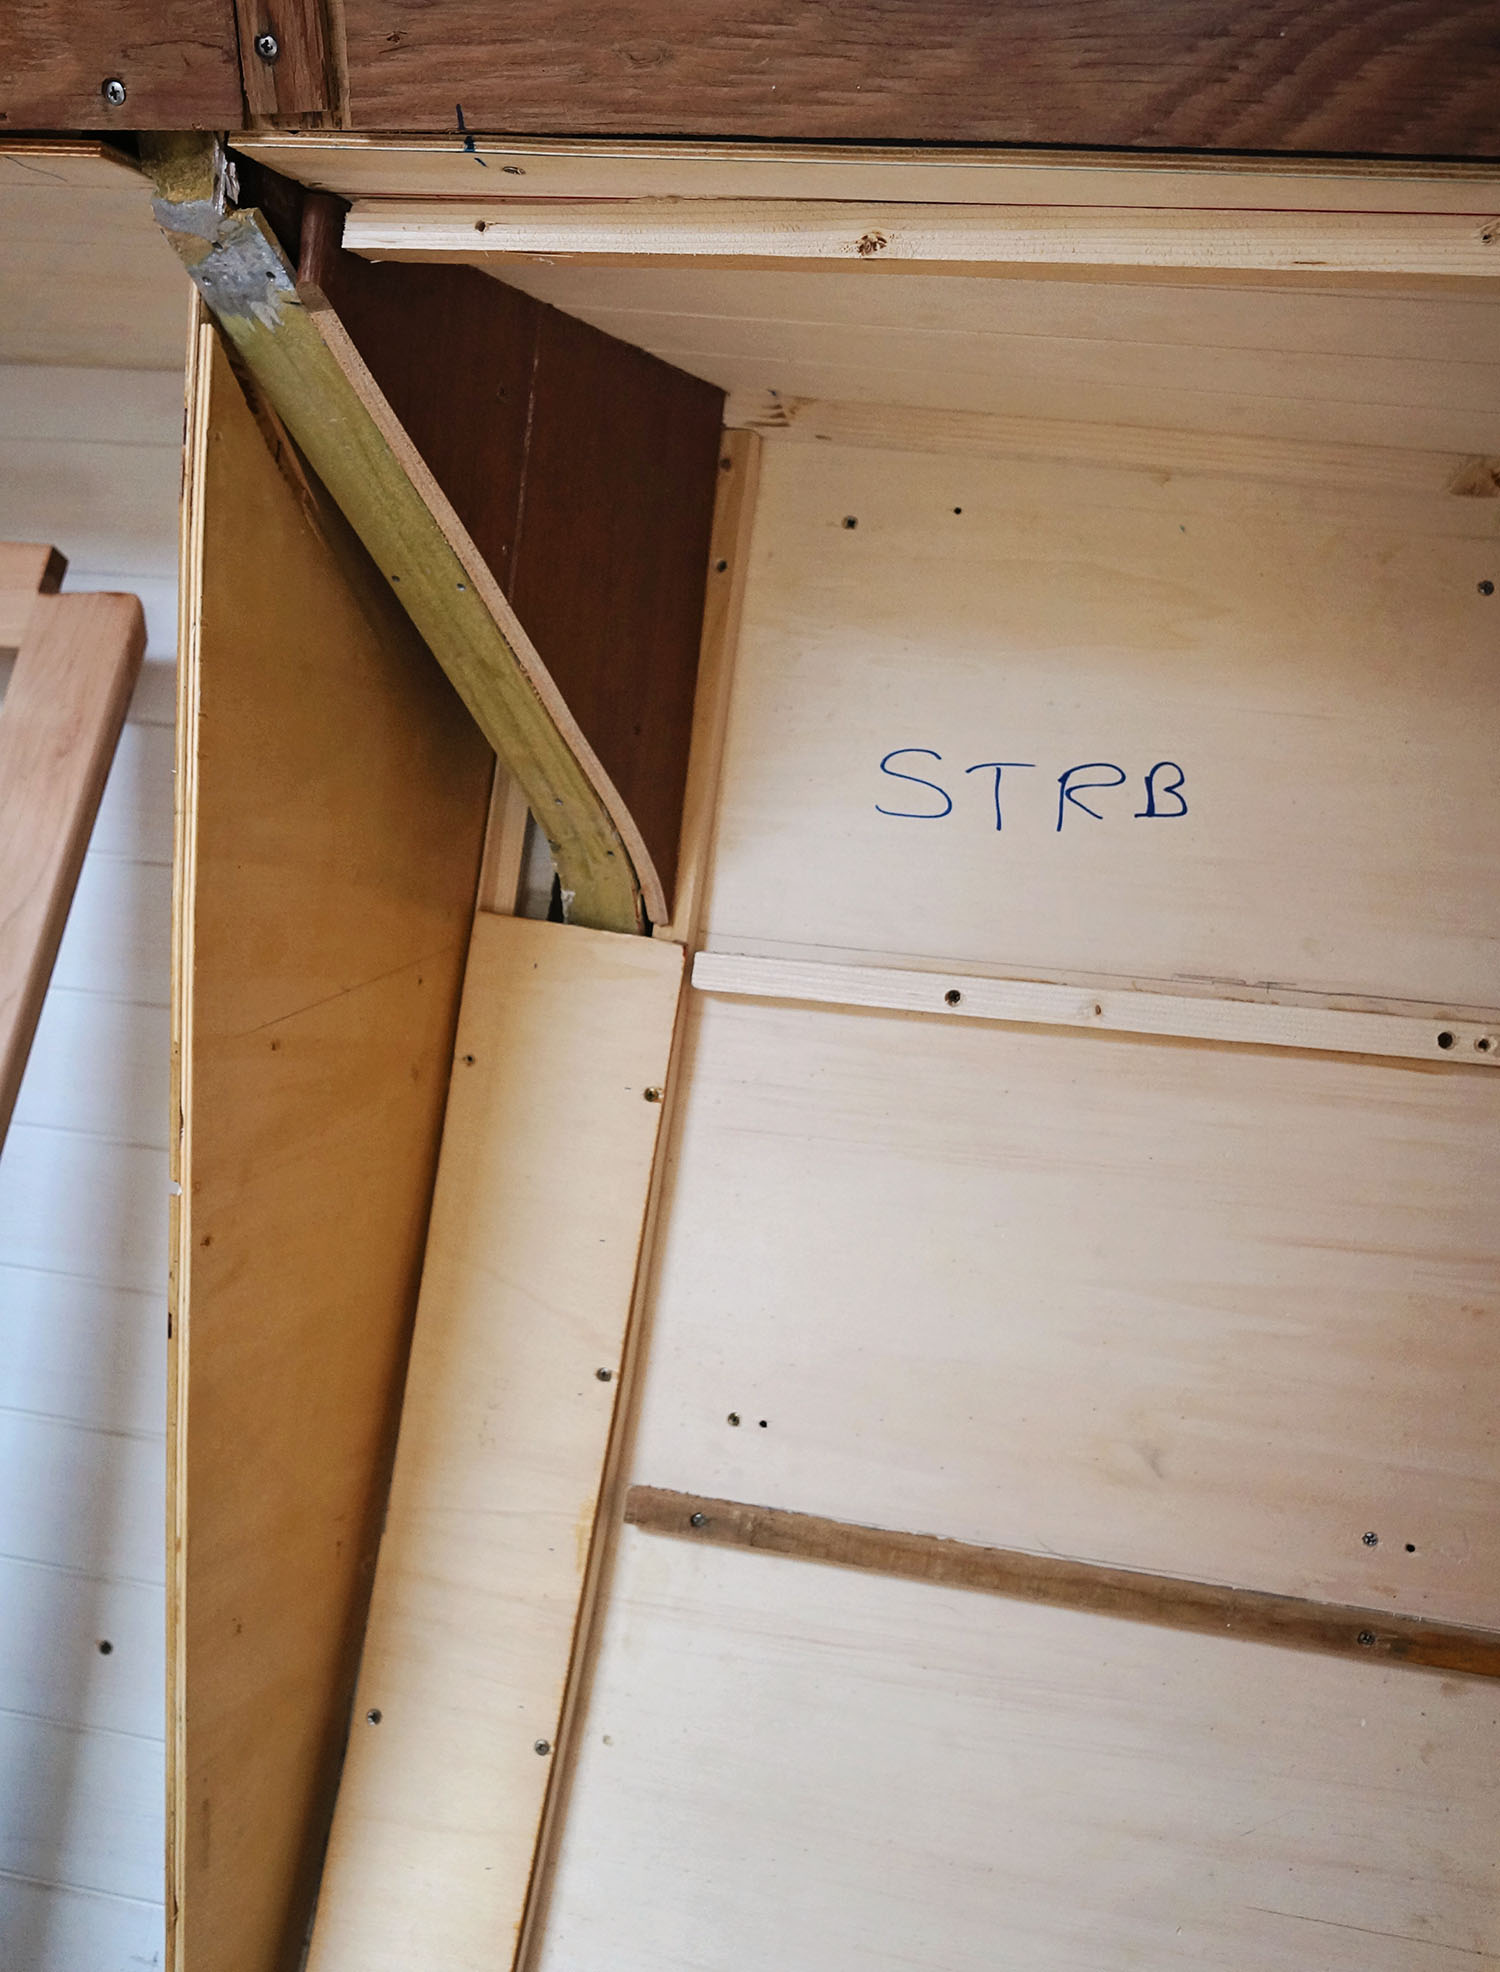
 Using a sheet of 1/2″ marine plywood we made the shelves for the cabinets, only having space for two total.  The top shelf should give plenty of space, the middle one a little less so, and I have no idea what’s going to be able to fit into the crack of the bottom area.  Maybe I should talk to Eagle Creek about some packing cubes that we can neatly store socks and underwear in?

The shelves themselves were slightly harder to make templates for with the odd shape of having to bend around the aluminum frame, but after minimal cursing and only a few wrong cuts with the jig saw on my part, we had them snugly fitting inside and it was time for my favorite part.  Painting!  Any time you hand me a bucket and a paint brush I am filled with joy because it means that area is ether near or at an end.  Plus this time I was even more so excited because it means that we can now transfer our clothes from where they are randomly strewn on the pilot house settee to an actual cabinet.

painting the inside cabinets

 The last part of this project, which we’re still working on at the moment, is making the doors.  They’re being done in tongue and groove, which Matt just about has perfectly down now, so that aspect is coming along nicely.  Getting them to fit into the frame with the exact same spacing on all four sides is a little harder.  Plus at the moment we’re waiting on our hinges to arrive before we can install them.  You know, the kind where you can’t slam the door because even when you try it will shut nice and softly for you?  We’ve opted for those.  A nice option when you live on a boat and a random wave might send the door cracking down on your hand.

framed cabinet without doors

Matt installing cabinet shelves

forward salon Trisalu 37

A Walk Through of Daze Off

Friday August 21, 2015

forward salon Trisalu 37

I feel like August has basically been a wash as far as boat building goes on the interior. June and July we were kicking things out, only to find ourselves mostly stalled at the moment. That’s not to say that work isn’t getting done. Our welder has been out almost every weekday since the beginning of the month and with that project getting completed it will be a load off our backs.

It’s just us two that can’t seem to be productive. I mostly blame the heat.Everyone tried to warn us that August is a killer and you’re better off just leaving your boat in the yard while you find cooler locations to kick up your heels for a few weeks, but we did not listen. We should have. I could be sitting on the shores of Lake Michigan right now, but we were incredibly stubborn and thought the heat would not apply to us. Wrong. We were oh so wrong. With daily highs between 91° to 93°, and the Real Feel usually leveling out at 105°, we have become insanely lethargic and probably a little brain damaged.

All in all, it feels like we’ve barely accomplished anything these past few weeks.  Which may be true, but then I do have to remind myself that we still have come a ways from where we first started.  I was looking at a few photos the other day of the first time we got on Daze Off to look at her and had to remark to Matt, “Wow, I can’t believe how different the salon looks now!”. And “That’s what the galley used to look like? I can’t even remember since we ripped it out”.

It was when I was telling him that I should put a few photos up on the blog to show how far we’ve actually come that he reminded me he took a little bit of video to send to our friends Kim and Scott on Anthyllide just before we moved the boat out of storage.  I realized that we never really did a ‘walk through’ before we started demolishing everything and this might be as close as we have to it.

Since Matt had been making the video for our aluminum boat buddies there was a lot of focus on the areas that will need to be fixed.  Areas of corrosion, rotting wood, ect.  I ended up cutting a lot of the video out or else you might be staring at a section of the hull or the sole for 30 seconds while Matt explained what will happen there in the long run and also replies to some of the questions our friends Kim and Scott had asked. Leaving the narrative on while the video now jumps all over the place was also somewhat odd, so I replaced it with music instead.

I know….I’m sure you’d love an explanation of the boat as it gets walked through, but trust me, this was specifically geared for our friends instead of a general audience.  Although it does make me think I should begin shooting a few explanatory videos as we go along with our work now.  We’ll see.

Anyway, here is the closest thing we have to a walk through of Daze Off in her before stages.  Not the best video, but hopefully it will give you a better idea of what she looked like as a whole before we started work on her.  And also, to show there is proof that even though we are nowhere near the finish line, at least we’re not still stuck at the start either.


Daze Off, cleaned forward salon

Sailing Bahamas

Throwback Thursday: The World is Not Enough


Now that we’re sitting in Indiantown Marina and it’s obvious that we’re going to be here for quite a long time while we fix up Daze Off to sail, I don’t want to bore you with stories that are only related to boat work (but don’t worry, they’re still coming).   I know that’s what some of you crave, but if you’re like me, you also need a little fun in there.  A little travel and a little adventure.

So for the foreseeable future while we are doing nothing much more than boat work I will be adding a Throwback Thursday post in every week as well.  Cataloging our trip so far, giving you that needed sense of travel and adventure, and for those of you that haven’t started with us from the beginning, catch you up on some of the most important or memorable parts of our travels.

Sometimes they’re not always the highlights but instead the downfalls.  Because sometimes, cruising sucks.  You can even be in paradise yet still find it sucking for a multitude of reasons.  This is where I found myself in late June after 10 months out, while sitting in the Bay Islands of Honduras.

We had just come from they Cayman Islands where we said goodbye to Brian and Stephanie, but made new friends of Nate and Jenn, a couple our age living on the island, and even brought Nate with us on our sail over as he was headed to the same place as us anyway.  Cruising through these beautiful islands I should have been so happy but for some reason being on a boat in the Caribbean, or anywhere really, was the last place I wanted to be. Read on to find out how you can have the whole world in front of you and sometimes it’s still not enough.**

You can find the original post here. Along with a lot of wonderful comments from a lot of readers and one really rude one from some guy.  What the heck?, man.

Friday June 21, 2013

Sailing Bahamas

I was hoping I wouldn’t have to admit this, but I don’t think I can hold it in any longer, especially with all the negative hints I’ve probably been dropping lately. I’m burnt out on cruising. At this moment I don’t want to do it any more. Neither of us really do, actually. I don’t know exactly how or when it came about, when the excitement and thrills turned to dread and loathing, all I know is that I want off of this boat and out of this lifestyle. Lately every day has been a struggle, and the worst part is, I can’t even figure out why. It’s not like anything has suddenly changed, that we’re in a terrible place, or have just faced weeks and weeks of bad weather, which could leave anyone yearning for their life back on land. The situation is the same. It’s somehow me that’s now different.

To figure out where this may have started, we’d have to go way, way back. Both of us had been thoroughly enjoying our travels until Hurricane Sandy hit us last October. The storm wasn’t bad, in fact, we had a nice little hurricane party in honor of it, but right after that the weather turned to shit. We spent the next month where the highs were in the 50′s, low’s in the 30′s, and the sky was overcast every day. But, we held out hope that things would get better. Traveling from Georgia to Florida, the sun broke from the clouds, I was able to peel off a few layers, and white sand beaches with clear waters were almost within our reach. I should not have spoken too soon. That evening we had our accident, which left us in Florida’s First Coast for three months while we waited on insurance, fixed the boat, and prepared ourselves to leave once more. Christmas was spent alone, on the hard in a boat yard, but we both still held hope that things would get better.

Finally, they did. We entered the Bahamas in mid-March, to the sunny days, crystal clear waters, and white sand beaches we both had been dreaming about. Reunited with good friends we traveled the islands, caught and cooked fish and lobster for dinner, and had bonfires under the starts at night. It was perfection, everything we could have dreamed of. Holding out hope had payed off a thousand times over. From the Bahamas we crossed over to Jamaica and Cuba, still with our friends, and still having the times of our lives. There were the normal hardships, sure, living on a boat doesn’t come without it’s difficulties, but for the most part all of these initial annoyances had become second nature by now. My rage didn’t pop up when I had to move all the pots and pans from our oven to the navigation station so I could use it for cooking, or when I had to use three of the steps on the companionway to temporarily store the contents of our chill box as I searched for the strawberry jam all the way at the bottom. We both became masters at unpacking and repacking our aft cabin/storage area to reach the paper towel stored all the way at the back. It wasn’t really hard anymore, it was just….how it was now.

So this still leaves me grasping at what has changed. I can tell you that it happened in Cayman. Here we were on this beautiful little slice of paradise, and after about three days there, I could have cared less. I wasn’t interested in walking the streets or browsing through the windows. After a couple of fun days of snorkeling, I didn’t feel like getting in the water anymore. Our lives became centered, for a short time, around boat work, and I figured that it, along with our rolling anchorage, was what was putting me in my foul mood. I think the only reason we got off the boat most of the time was because our friends made plans that involved us, and even though I’d go back to my ol’ happy self while we were with them, as soon as we got back to Serendipity, the unhappiness sank back in.

Matt was going crazy in his own mind with never ending boat repairs, and this constant creaking noise that’s been in some of the floor boards ever since our accident. I think he was tired of the cost and the work related to cruising. I was just…tired. I wanted creature comforts again, I wanted to go home. One night, when Matt did his usual song and dance of not wanting to cruise, I gave in. (For those of you who don’t know, even though cruising was originally his idea, by the time we were getting ready to leave, he changed his mind and decided he didn’t want to do it anymore. He was happy with his life at home, and with all the money we’d saved up, we could have had a very comfortable lifestyle there. A condo on the 14th floor in the heart of downtown? That’s all starting to sound very nice now. But back then, it was me who still wanted to go, dragging him along, somewhat kicking and screaming at the beginning.) I never knew if these were serious request before, I’d always talk him back into the cruising lifestyle, saying that when he got older he’d regret that he didn’t travel the world, but this time, I wanted out just as bad. When he said “That’s it, I’m done with it”, as he tends to do at least every other week, I replied, “Me too, let’s go home”. But, to switch up roles, it was him that talked me into staying, stating that we’d at least get ourselves to Guatemala and re-evaluate there.

Which, while on the topic of traveling, I have another confession to make. We HATE passages. Seriously dread them. It’s not that they’re scary or overwhelming. They’re just incredibly boring and uncomfortable, and for days at a time. I didn’t mind them too much while going down the eastern seaboard. It was mostly just day traveling down the ICW, and the few hops out into the Atlantic, usually only for 24 hours, or 36 max. Were those passages comfortable? No, probably some of the worst we’ve had (damn you Northern Atlantic!), but, the excitement was there still, because every passage meant more miles south. Closer to warm weather, closer to clear waters, and closer to sandy beaches. But ever since we left the Bahamas and there are no more ‘day trips’, and neither of us are now too fond of the thought of traveling in a boat. Worst.Cruisers.Ever.

I thought a change of scenery might help, but the feelings haven’t changed since we’ve gotten to Utila. For the past few days, Matt’s been doing his best trying to cheer me up, telling me we can do whatever I want, but it still hasn’t made a difference. Have I already become jaded? It almost feels like no matter what island or location I could place myself right now, the Cook Islands in the South Pacific, or the azul waters of Greece, I wouldn’t be happy. Which, in the end, makes me feel ten times worse about the situation. How spoiled must I be to lead the life I do, and not have it be enough for me? Who knows, maybe it’s just the waves rattling my brain around too much, and I haven’t been able to think straight lately Or maybe, the world is not enough. I really hope it’s the first one, because I can’t wait to get those feelings of excitement back.*

Ragged Islands Bahamas

I feel like my life has gone from this

Chesapeake in fog

To this.


*Editor’s Note (a few weeks later):  We are now in Guatemala, and back to our regular selves.  Time spent in a marina, living a somewhat normal life again, has done wonders for our attitude.  I can’t say I’m still looking forward to crossing the Caribbean Sea again, but, maybe after a few more months the excitement will restore itself.  I’m also finding out from a herd of other bloggers right now, that cruising can make one…a little bipolar.  As bad as I feel for anyone else going through these emotions, I’m also glad to know I’m not the only one.

**The good news is, after all the miles we logged in 2014 with passages ranging from 3 days to 28 days, we’ve discovered that we do like sailing again.  The hard part is in fact those 36-96 hour passages where they’re not over in the blink of an eye yet you don’t have the time to settled into a groove.  Maybe not the worst cruisers ever anymore?

Jessica routing Eurolite

The Process of Routing & Templating

Sunday August 16, 2015

Jessica routing Eurolite

I feel so all over the place with this blog right now because none of our projects seem to go in order, and there’s usually the distinct possibility that we’re working on five different things at one time.  Depending on if the welder is in for the day or if we have just a few hours to kill before the rain comes in, it seems like we’re switching up projects daily or even hourly. Which hasn’t always made it the easiest thing to track our progress on the blog or even know what to write about.

Welding?  It’s been an ongoing project for the past two weeks now that is going to need so much more time before it’s finished that I’m not even sure what to write about it at the moment.  Should I give little snippets as they come, or wait until the job is finished and center a post wholly on that?  The clothing cabinets we’re trying to build in the forward salon?  Don’t even get me started on those.  Between odd angles and trying to cover up aluminum frames, that project has us scratching our heads and Matt playing out a million scenarios of what solutions we might have available.  Most of which won’t pan out.

So while these other projects are still ongoing and will be for the next few weeks, I’ll take you through one of our smaller projects: routing and templating.

One of the areas we hadn’t touched yet in the forward salon was replacing the overhead.  Previously in this area were long 5 3/4″ wide boards spanning the length, forward to aft, held together by some trim running abeam.  Although these boards never actually looked that bad and probably could have been kept, we didn’t like the variance in size between the grooves of what we’re doing to the walls and would like to keep it all uniform.  So for us to replace them is the same way we would do the walls, just placing it overhead instead.

If we were doing the walls we’d normally have to make our own templates out of scrap 1/4″ wood which is a pain in the butt. Tracing, cutting, and hot gluing these little strips together until they perfectly outline the space we want the new wall to be placed, but in this instance we’re able to keep the existing overhead boards in tact so we can trace them onto our Eurolite and easily cut out the shape we need.

Using much caution since the trim was the only thing keeping these boards together, we unscrewed them just far enough until they became unattached from the furring strips, and while I held the boards from falling down with my arms up over my head, we gently lowered them and brought them down the ladder to our work area until we were ready for them.

taking off old overhead

bare overhead with foam

Since we were replacing such a large area we started out with a brand new 4′ x 8′ sheet of 1/4″ marine plywood Eurolite.  Positioning it on our sawhorses in front of Daze Off, it was my job to mark the board every 3 1/4″, the distance between our grooves.  I will admit there have been one or two instances where my measurements have been off before, resulting in sloping lines, so now I’m adamant to check each side 2-3 times now before we begin routing.  You’d think I’d have the numbers memorized by now… 3 1/4, 6 1/2, 9 3/4, 13….but somehow after 26 I always begin to get a little confused and by the time I hit the 45″ area I can never remember if I’m supposed to be at an extra quarter inch or half.

In any case, we now measure at least twice and cut only once.  When I’m sure I have my numbers down we bring out our large straight edge, an 8′ long section of aluminum that we clamp down to the Eurolite exactly where I’ve made my marks.  Either Matt or I (usually Matt) will then take our router with a v-groove bit installed, and run it down the length of the board making sure to keep it tight against our aluminum straight edge to ensure a straight line.  The reason it’s not always me doing this job is I um…I’m not always so good at that part.  Luckily we’ve been able to hide all my mistakes so far.

After each line has had the router passed through it we move the straight edge up to the next mark and so on and so on until we’ve covered the whole board.  A large amount of sawdust tends to accumulate so I’m usually taking a little brush and cleaning the board after each sweep.  From start to finish this part usually takes about an hour.  Before we can begin tracing the template though, we do a good sanding of all the new grooves to take away the rough edges from the router and also give it more of a rounded transition into the board.

Matt routing Eurolite

close up of routing

Jessica routing Eurolite

Jessica routing Eurolite

 The last step is to take our template, in whichever form it may be in, and place it on the board of Eurolite to trace and cut.  Depending on the area it is getting placed into and if it’s the first board in a section or a continuation of an existing board into another area, we have to make sure the routed lines match up and flow together so we don’t have one routed line butting up to the center of a strip when two boards are matched up together.  Usually we take extra care in this by starting with the existing board and taking a measurement of where the first groove is from the edge.  Then we know for the next board that we also have to make the first groove come in 1 1/4″ or so from the edge.

In the case of this overhead piece we also had to have our Eurolite board and template facing down so that both pieces had the lines facing the same way.  One of our first times we accidentally had our Eurolite board facing up while the template was facing down and essentially cut our piece backwards and wasted that sheet of Eurolite.  It was not a good day.

Lining everything up we added a little extra area to the template from where we noticed it wasn’t fully butting up against the wall.  We’re learning it’s usually better to be a little large and cut down where necessary.  Which also happens a lot in this process.  I’d say that once we have the new piece of Eurolite cut out there are approximately four trips up and down the ladder with the new board and we try and fit it in it’s new space and then have to shave off 1/8″ here and there.  Eventually though we do get it right and then it’s time to screw it into place.

placing template over Eurolite

Matt tracing template

mistake in routing